Scroll to:
Effect of 3D printing mode on structure and fatigue strength of 30CrMnSi steel
https://doi.org/10.17073/0368-0797-2024-6-696-701
Abstract
The desire of modern manufacturers to reduce the cost of producing goods leads to an increased search for ways to obtain the raw materials for future products more efficiently. One promising method for obtaining raw materials is electric arc surfacing (WAAM), which is discussed in this paper. The aim of the study was to investigate the effect of electric arc surfacing on the structure and fatigue strength of 30CrMnSi steel. To obtain the samples, two walls were surfaced according to the specified modes: I = 150 A, U = 25 V, Q = 600 J/mm (mode 1) and I = 110 А, U = 17 V, Q = 300 J/mm (mode 2). During the study of the walls microstructure after milling, it was found that when the metal is surfaced according to the mode 1, large accumulations of technological defects such as pores and bad welding form in the material. When the metal is treated according to the mode 2, these macroscopic defects are practically not detected. During optical emission analysis, it was observed that during the surfacing process, alloying elements are consumed and the carbon content decreases most actively. It should be noted that the burnout of elements occurs more actively when the metal is surfaced using the mode 1. This may be due to the higher energy input in this process. A predominant ferrite-sorbite structure was found in the metal surfaced using the mode 1. However, local ferritic colonies were revealed on the surface of the samples due to their height. The microstructure of the samples produced using the mode 2 is mainly composed of ferrite and pearlite. Ferrite is isolated as closed grids along the boundaries of the austenitic grains, and traces of a Widmanstetten structure can also be seen. Perlite is present both as highly dispersed plates and partially spheroidized colonies. Despite the fact that the structure of the samples produced using the mode 1 is generally considered to be more favorable in terms of material properties, the fatigue strength of the samples produced according to the mode 2 exceeds that of the mode 1 by an average of 70 %. This may be due to the stronger influence of technological defects on the metal fatigue resistance than microstructural ones.
For citations:
Mantserov S.A., Anosov M.S., Mordovina Yu.S., Chernigin M.A. Effect of 3D printing mode on structure and fatigue strength of 30CrMnSi steel. Izvestiya. Ferrous Metallurgy. 2024;67(6):696-701. https://doi.org/10.17073/0368-0797-2024-6-696-701
Introduction
Modern manufacturing is increasingly focused on reducing production costs. In this context, additive manufacturing methods are gaining widespread adoption due to their unique technological capabilities for producing complex-shaped preforms from a wide range of materials [1 – 3].
The main additive manufacturing methods currently known are selective laser melting (SLM) [4; 5], laser powder deposition (e.g., LENS/DMD) [6; 7], and wire arc additive manufacturing (WAAM) [8; 9]. Among these, WAAM is considered the most productive and technologically straightforward method [8; 10; 11].
Despite the significant advantages of additive manufacturing methods over traditional approaches, the processes occurring in the metal during surfacing (primarily structure formation) remain insufficiently studied. Literature [12; 13] indicates substantial differences in the microstructure and, consequently, the properties of metals in surfaced preforms compared to materials produced by traditional methods. These non-standard microstructures result from crystallization under non-equilibrium conditions during layer surfacing and the high number of high-temperature thermal cycles involved in surfacing. The main challenges in using WAAM for producing preforms include:
– selecting surfacing parameters considering the burnout of alloying elements;
– ensuring structural uniformity along the height of the surfaced metal;
– determining the optimal heat treatment (HT) mode that accounts for the altered chemical composition of the material after surfacing [14 – 16].
At the same time, achieving the desired combination of properties in products without additional heat treatment of preforms can significantly reduce production costs.
30CrMnSi steel is widely used in the manufacture of components operating at temperatures up to 200 °C. Products made from this steel (such as shafts, axles, levers, push rods, etc.) often work under alternating loads, which can lead to fatigue failure of structures. Achieving a sufficient level of fatigue strength without heat treatment (tempering) in this material is a promising goal for domestic industry.
Thus, the aim of this study is to investigate the effect of electric arc surfacing mode on the structure and fatigue strength of 30CrMnSi steel.
Materials and methods
The samples used in the study were surfaced as walls on an experimental WAAM test bench, which included a three-axis CNC gantry machine (IVCNC STL), an Alloy 275 ME Pulse welding power source, an exhaust hood, a welding table, and a welding torch. The 3D printing method used on this test bench is protected by patent RU 2696121C1. NP-30CrMnSi welding wire was used for surfacing the samples, with two walls surfaced as part of the sample preparation. The surfacing mode was defined by the following parameters: current (I, A), voltage (U, V), arc gap (z, mm), wire feed speed (V, mm/s), and shielding gas flow rate. The arc gap and wire feed speed were kept constant for all experiments at 11 mm and 300 mm/min, respectively. The shielding gas flow rate was also held constant.
The linear energy (Q) of the process (electrical energy per unit length of the weld) was determined based on the 3D printing modes as one of the key comprehensive parameters, calculated according to the formula provided in GOST R ISO 857-1-2009, considering an energy loss coefficient of 0.8:
| \[Q = \frac{{0.8IU}}{V}.\] | (1) |
Table 1 presents the surfacing modes for each surfaced wall and the corresponding values of the linear energy of the surfacing process.
Table 1. Surfacing modes
|
Metallographic studies were conducted on transverse cross-sections relative to the surfacing direction at magnifications of 100× and 500× using an Altami MET1C optical microscope. Preparation of metallographic sections followed a standard procedure involving mechanical grinding with abrasive paper of various grit sizes and polishing with paste. A 5 % alcoholic solution of nitric acid (nital) was used as the etchant for chemical etching [17].
Fatigue test samples were cut from the preforms along the surfacing direction. Fatigue tests were conducted using a cantilever bending scheme in accordance with the requirements of GOST 25.502–79. The sample had a thickness of 3 mm and a working zone size of 60×15 mm (Type IV according to GOST 25.502), tested at a frequency of 8.3 Hz.
The chemical composition of the surfaced metal was determined using optical emission spectrometry on a Foundry-Master spectrometer.
Results
The results of the chemical analysis of the surfaced metal and the composition of the initial wire are presented in Table 2.
Table 2. Chemical composition of the surfaced metal and the initial wire
|
As shown in Table 2, the surfacing process results in a reduction in the content of alloying elements, which is attributed to burnout, a phenomenon characteristic of casting and welding processes. The most significant reduction is observed in carbon content. It should be noted that the burnout of elements is more pronounced in samples surfaced using mode 1, which may be associated with the higher linear energy of the process.
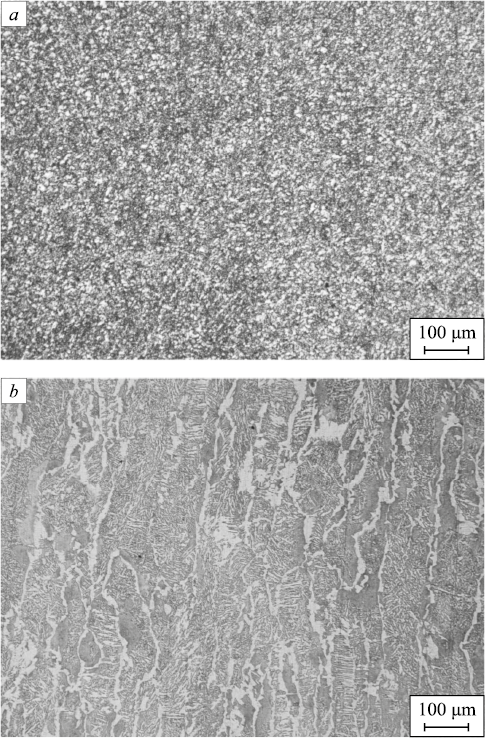
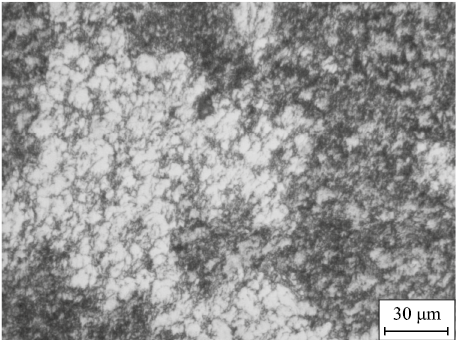
The microstructures of 30CrMnSi steel samples surfaced using both modes are shown in Fig. 1. The microstructure of the sample surfaced using mode 1 is represented by ferrite and troosto-sorbite, which may indicate quenching and tempering processes occurring during the surfacing of subsequent metal layers. This structure is favorable and, when considered layer by layer, uniform within a single layer. However, structural heterogeneity is observed across the height of the sample, with distinct areas containing large ferritic colonies (Fig. 2).
Fig. 1. Microstructure of 30CrMgSi steel samples:
Fig. 2. Microstructure of the sample surfaced according to the mode 1 |
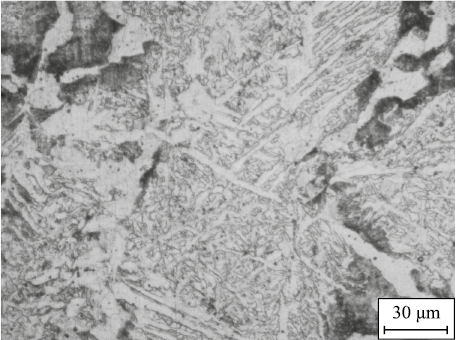
In the metal surfaced using mode 2, an anomalous ferrite-pearlite structure was observed. Due to significant overheating during surfacing and accelerated cooling, ferrite is distributed as closed networks along the boundaries of former austenitic grains, forming a Widmanstätten structure. Determining the morphology of pearlite at a magnification of 100× is challenging. At higher magnifications, the microstructure of the sample surfaced using mode 2 (Fig. 3) clearly reveals the Widmanstätten structure. Additionally, pearlite is observed in the form of highly dispersed plates and partially spheroidized colonies.
Fig. 3. Microstructure of the sample surfaced according to the mode 2 |
An analysis of the microstructures of samples surfaced under different modes (Figs. 1 – 3) showed that mode 1 leads to more active recrystallization of the structure in previously surfaced layers. This is attributed to the greater amount of thermal energy delivered to the material. Despite the more favorable structure achieved during surfacing, structural heterogeneity along the height of the sample is observed, which may lead to a reduction in the mechanical properties of the metal. Additionally, there is an increased risk of metal spattering, elevated porosity, and other technological defects during surfacing using mode 1, which can further degrade the overall properties of the material.
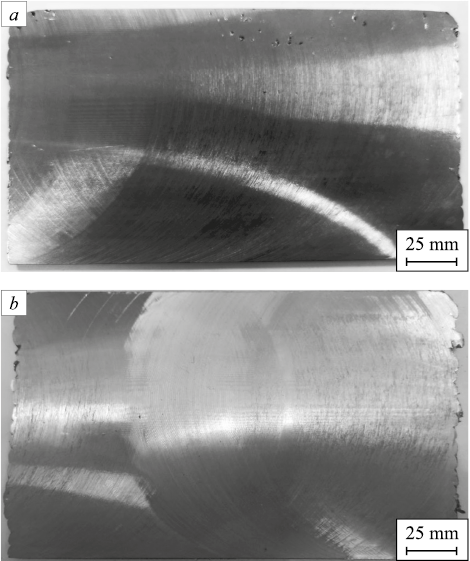
Technological macrodefects are clearly visible on the surfaced walls after milling (Fig. 4). In the preform surfaced using mode 1, significant clusters of macrodefects, including pores and lack of fusion [18; 19], are evident. These defect clusters evidently contribute to a reduction in the overall mechanical properties of the material [20; 21]. In contrast, macrodefects are almost entirely absent in preforms surfaced using mode 2.
Fig. 4. Macrostructure of milled walls: |
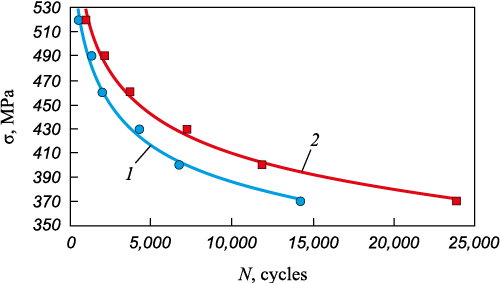
The data obtained from fatigue strength tests of samples surfaced under different modes are presented in Fig. 5.
Fig. 5. Graph of low-cycle fatigue of the samples: |
Although the structure of the samples surfaced using mode 1 is considered more favorable in terms of material properties, the fatigue strength of the samples produced using mode 2 exceeds the corresponding values for mode 1 by an average of 70 % (Fig. 5). This effect may be attributed to the presence of macropores, bad welding, and other technological defects in the metal (mode 1). Based on the data in Fig. 5, it can be concluded that technological defects have a greater impact on the fatigue strength of the metal than microstructural imperfections.
Conclusions
The study revealed that the surfacing mode significantly influences not only the metal’s structure formation but also the presence of technological macrodefects (such as pores, incomplete fusion, lack of bonding, etc.). Although the structure of the metal surfaced using mode 1 is more favorable for the mechanical properties of the final product, the accumulation of macrodefects leads to a reduction in the overall property set of the preform.
Microstructural analysis showed that the structure of the metal surfaced using mode 1 (I = 150 A, U = 25 V, Q = 600 J/mm) is predominantly composed of ferrite and sorbite. However, localized ferritic colonies are observed along the height of the sample. The structure of samples surfaced using mode 2 (I = 110 A, U = 17 V, Q = 300 J/mm) exhibited an anomalous ferrite-pearlite structure formed as a result of significant overheating during surfacing and rapid cooling. In this case, ferrite is distributed as closed networks along the boundaries of the former austenitic grains, and a Widmanstätten structure is also observed. Pearlite is present as highly dispersed plates and partially spheroidized colonies.
The fatigue strength of samples produced using mode 2 is, on average, 70 % higher than that of mode 1. This difference is primarily attributed to the greater impact of technological defects (such as pores, incomplete fusion, and bad welding) on the metal’s fatigue strength compared to microstructural imperfections.
References
1. Herzog D., Seyda V., Wycisk E., Emmelmann C. Additive manufacturing of metals. Acta Materialia. 2016;117:371–392. https://doi.org/10.1016/j.actamat.2016.07.019
2. Zakay A., Aghion E. Effect of post-heat treatment on the corrosion behavior of AlSi10Mg alloy produced by additive manufacturing. JOM. 2019;71:1150–1157. https://doi.org/10.1007/s11837-018-3298-x
3. Ding D., Pan Z., Cuiuri D., Li H. Wire-feed additive manufacturing of metal components: Technologies, developments and future interests. The International Journal of Advanced Manufacturing Technology. 2015;81:465–481. https://doi.org/10.1007/s00170-015-7077-3
4. Kathiresan M., Karthikeyan M., Immanuel R.J. A short review on SLM-processed Ti6Al4V composites. Proceedings of the Institution of Mechanical Engineers, Part E: Journal of Process Mechanical Engineering. 2023;0(0). https://doi.org/10.1177/09544089231169380
5. Piekło J., Garbacz-Klempka A., Myszka D., Figurski K. Numerical and experimental analysis of strength loss of 1.2709 maraging steel produced by selective laser melting (SLM) under thermo-mechanical fatigue conditions. Materials. 2023;16(24):7682. https://doi.org/10.3390/ma16247682
6. Kumar S.P., Anand K., Chealvan S.H., Muthu S.K. Review on surface characteristics of components produced by direct metal deposition process. Journal of Mechanical Engineering and Sciences. 2022;16(4):9197–9229. https://doi.org/10.15282/jmes.16.4.2022.05.0729
7. Zhao P., Yi Z., Liu W., Kaiyuan Z., Luo Y. Influence mechanism of laser defocusing amount on surface texture in direct metal deposition. Journal of Materials Processing Technology. 2022;312:117822. https://doi.org/10.1016/j.jmatprotec.2022.117822
8. Li J., Alkahari M.R., Rosli N.A., Hasan R., Sudin M.N., Ramli F.R. Review of wire arc additive manufacturing for 3D metal printing. International Journal of Automation Technology. 2019;13(3):346–353. https://doi.org/10.20965/ijat.2019.p0346
9. Pant H., Arora A., Gopakumar G.S., Chadha U., Saeidi A., Patterson A.E. Applications of wire arc additive manufacturing (WAAM) for aerospace component manufacturing. The International Journal of Advanced Manufacturing Technology. 2023;127:4995–5011. https://doi.org/10.1007/s00170-023-11623-7
10. Jackson M.A., Van Asten A., Morrow J.D., etc. Energy consumption model for additive-subtractive manufacturing processes with case study. International Journal of Precision Engineering and Manufacturing-Green Technology. 2018;5(4):459–466. https://doi.org/10.1007/s40684-018-0049-y
11. Pinto-Lopera J.E., Motta J.M., Absi Alfaro S.C. Real-time measurement of width and height of weld beads in GMAW processes. Sensors. 2016;16(9):1500. https://doi.org/10.3390/s16091500
12. Abid S., Rezo A., Henning Z., Stefan K. A Review of the recent developments and challenges in wire arc additive manufacturing (WAAM) process. Journal of Manufacturing and Materials Processing. 2023;7(3):97. https://doi.org/10.3390/jmmp7030097
13. Lan B., Wang Y., Liu Y., Paul H., Christopher H., Guodong Z., Xuejun Z., Jun J. The influence of microstructural anisotropy on the hot deformation of wire arc additive manufactured (WAAM) Inconel718. Materials Science and Engineering: A. 2021;823:141733. https://doi.org/10.1016/j.msea.2021.141733
14. David S., Mitun D., Baolong Z., Alexandra L.V., Susmita B., Amit B., Julie M.S., Enrique J.L., Noam E. Directed energy deposition (DED) additive manufacturing: physical characteristics, defects, challenges and applications. Materials Today. 2021;49:271–295. https://doi.org/10.1016/j.mattod.2021.03.020
15. Kennedy J., Davis A., Caballero A.E. Microstructure transition gradients in titanium dissimilar alloy (Ti-5Al-5V-5Mo-3Cr/Ti-6Al-4V) tailored wire-arc additively manufactured components. Materials Characterization. 2021;182:111577. https://doi.org/10.1016/j.matchar.2021.111577
16. Tomar B., Shiva S., Nath T. A review on wire arc additive manufacturing: Processing parameters, defects, quality improvement and recent advances. Materials Today Communications. 2022;31:103739. https://doi.org/10.1016/j.mtcomm.2022.103739
17. Beckert M., Klemm H. Handbuch der metallographischen Ätzverfahren. Leipzig: VEB, Deutscher Verlag für Grundstoffindustrie; 1966:388. (In Germ.).
18. Vasin O.E., etc. Atlas of Defects. Scientific and Technical Collection. Yekaterinburg: Izdatel’skie resheniya; 2008:56. (In Russ.).
19. Kalinichenko N.P., Vasilyeva M.A., Radostev A.Yu. Atlas of Defects in Welded Joints and Base Metal: Textbook. Tomsk: Tomsk Polytechnic University; 2011:71. (In Russ.).
20. Nguyen N., Ruban A.R. Influence of defects in welds on mechanical properties of steel frame specified under static loading. Vestnik of Astrakhan State Technical University. Series: Marine engineering and Technology. 2015;(2): 14–22. (In Russ.).
21. Sarkeeva A.A., Kruglov A.A., Muxametraximov M.X., Pore effect on mechanical properties of layered material from titanium alloy. Letters on Materials. 2013;3(1):12–15. (In Russ.). https://doi.org/10.22226/2410-3535-2013-1-12-15
22.
About the Authors
S. A. MantserovRussian Federation
Sergei A. Mantserov, Cand. Sci. (Eng.), Assist. Prof., Head of the Chair “Automation of Mechanical Engineering”, Director of the Institute of Industrial Technologies of Mechanical Engineering”
24 Minina Str., Nizhny Novgorod 603022, Russian Federation
M. S. Anosov
Russian Federation
Maksim S. Anosov, Cand. Sci. (Eng.), Assist. Prof. of the Chair “Technology and Equipment Engineering”
24 Minina Str., Nizhny Novgorod 603022, Russian Federation
Yu. S. Mordovina
Russian Federation
Yuliya S. Mordovina, Engineer of the Chair “Technology and Equipment Engineering”
24 Minina Str., Nizhny Novgorod 603022, Russian Federation
M. A. Chernigin
Russian Federation
Mikhail A. Chernigin, Engineer of the Chair “Technology and Equipment Engineering”, Postgraduate
24 Minina Str., Nizhny Novgorod 603022, Russian Federation
Review
For citations:
Mantserov S.A., Anosov M.S., Mordovina Yu.S., Chernigin M.A. Effect of 3D printing mode on structure and fatigue strength of 30CrMnSi steel. Izvestiya. Ferrous Metallurgy. 2024;67(6):696-701. https://doi.org/10.17073/0368-0797-2024-6-696-701


