Scroll to:
Deformation and fracture of heat treated ribbon of amorphous Co – Fe – Cr – Si – B alloy during indentation
https://doi.org/10.17073/0368-0797-2024-5-556-562
Abstract
Indentation is an attractive method for studying the deformation behavior of amorphous alloys for a number of reasons: not being specific to the sample size, these tests are easy to perform and do not lead to macrofracture; plastic deformation in the material is locally limited, which facilitates the study of plastic flow in the zones surrounding and located under the indenter; direct comparison of indentation results with responses, for example, to bending or tension further makes the indentation method an effective “probe” for understanding the physics of plastic deformation and fracture of amorphous alloys. The morphology of microprints of melt-quenched ribbon of Co70.5Fe0.5Сr4Si7B18 amorphous alloys subjected to heat treatment in a wide range of temperatures was studied after indentation on an elastic substrate. Structural-phase transformations were controlled by X-ray structural analysis and differential scanning calorimetry. We discovered characteristic modifications in the patterns of their deformation and fracture during the transition from amorphous to crystalline state. Three temperature ranges with characteristic deformation zones on the surface of the studied samples were established. At Troom < Tf , amorphous alloy demonstrates unique plasticity. The shear bands appear around the imprint only at the maximum load on the indenter. Tf ≤ Tan ≤ Tsb is a transitional interval, since cracks do not form at lower temperatures, and there are no shear bands at higher temperatures. The alloy is in an amorphous but brittle state, so radial and ring cracks, as well as spalls, are observed. The interval Tsb < Tan ≤ Tcrys corresponds to the final transformation of the alloy into a crystalline state; symmetrical patterns of fracture are formed, consisting of square crack networks. It is possible to give an approximate express assessment of the structural state of amorphous alloys based on an “atlas” of local loading zones (presence/absence of shear bands, cracks, their relative position) compiled taking into account the corresponding temperature intervals under different loads.
Keywords
For citations:
Permyakova I.E., Kostina M.V. Deformation and fracture of heat treated ribbon of amorphous Co – Fe – Cr – Si – B alloy during indentation. Izvestiya. Ferrous Metallurgy. 2024;67(5):556-562. https://doi.org/10.17073/0368-0797-2024-5-556-562
Introduction
The process of amorphization, achieved by ultrarapid melt-quenching, allows for the production of homogeneous multicomponent amorphous alloys (AA). By varying the conditions of melt-quenching, it is possible to significantly expand the range of mutual solubility of elements, enabling a broader variation of AA properties compared to crystalline materials [1 – 4]. If heat treatment is also applied, a wide range of intermediate states can be obtained – from “purely” amorphous to amorphous-nanocrystalline and fully crystalline – enabling the creation of unique and diverse amorphous systems (metastable forms of binary, ternary, and multicomponent alloys) [5 – 7]. By adjusting the composition and applying controlled heating, it is possible to achieve useful and predefined physical properties, expanding the application of AA in engineering and industry as structural and functional materials [8 – 11]. The excellent magnetic properties of AA are complemented by other valuable characteristics such as high strength, hardness, electrical resistivity, corrosion resistance, and satisfactory plasticity. However, when applied in practice, issues such as thermal stability, embrittlement, and spontaneous crystallization at elevated temperatures are of particular concern [12 – 14]. To evaluate the structural-phase state of AA, a comprehensive set of research methods is used (e.g., transmission electron microscopy (TEM), X-ray structural analysis, differential thermal analysis, etc.). Some of these methods require multi-stage sample preparation and involve lengthy and labor-intensive phase identification processes. Moreover, when AA has been processed at temperatures below crystallization and remains in an amorphous state, there are significant challenges in studying the amorphous structure. Even high-resolution TEM and EXAFS-spectroscopy (Extended X-Ray Absorption Fine Structure) cannot definitively provide information about atomic arrangements and positional changes during relaxation. Studying structure-sensitive property responses (mechanical, electrical, chemical, magnetic) allows the analysis of structural relaxation processes [15 – 17].
Currently, the micro- and nanoindentation is an informative method for investigating the mechanical characteristics of melt-quenched amorphous alloys (hardness, Young’s modulus, fracture toughness) [18 – 22]. This method is also valuable for understanding the micromechanisms of their deformation, as it allows for the visualization of the deformation pattern and the assessment of the extent and shape of deformation zones in correlation with the structural state of the amorphous alloys. Indentation testing is an excellent tool for such studies, especially when only a small amount of material is required. Deformation during indentation is essentially stable, at least macroscopically, since the contact area between the indenter and the deformed material increases during indentation to accommodate any applied load. However, local loading of amorphous alloys has several specific features related to their unique geometry – small thickness of amorphous alloys ribbons and the qualitative difference between the contact side (adjacent to the quenching drum during production) and the free side of the ribbon [23]. Moreover, plastic flow in amorphous alloys under high stresses and low temperatures occurs non-uniformly, localizing in shear bands along planes of maximum shear [24; 25]. The formation of these shear bands is associated with localized atomic rearrangements correlated with regions of excess free volume [26 – 28]. Shear bands are crucial for the deformation behavior of amorphous alloys, and controlling them is equivalent to managing the plasticity and fracture of the material.
The aim of this work is to study the mechanical behavior of heat-treated thin melt-quenched amorphous alloy ribbons during microindentation, specifically to reveal the patterns of deformation zone modification and surface microfracture of amorphous alloys around the imprints formed by the Vickers pyramid, as the annealing temperature increases.
Materials and methods
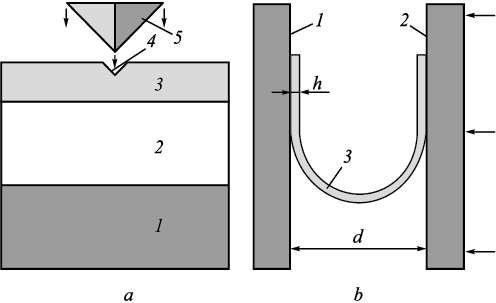
The object of the study was an amorphous alloy Co70.5Fe0.5Сr4Si7B18 (at. %), produced by melt-spinning process in the form of a ribbon with a thickness of 30 μm and a width of 20 mm. Alloy samples measuring 15×20 mm were subjected to vacuum annealing in the temperature range of Tan = 538 – 823 K for 10 min. Afterward, they were fixed using an elastic substrate – “Moment” glue (20.52.10.190 OKPD 2 / GOST 22345-77) with a thickness of approximately 1.0 – 1.5 mm on a steel plate. As a result, a composite blank was formed (Fig. 1, a).
Fig. 1. Scheme of mechanical tests of ribbon of amorphous alloys: |
Indentation was performed on the free side of the amorphous alloy ribbons across a wide range of loads (0.3 – 2.0 N) using a PMT-3M microhardness tester (LOMO). It is important to note that local loading on a hard substrate (for example, putty) presents a fundamentally unavoidable difficulty: cracks may initially form in the substrate and subsequently initiate the failure of the coating, i.e., the amorphous alloy.
The macroscopic plasticity behavior of the amorphous alloys was assessed by the U-method (by bending deformation). For this, the sample was placed between two flat parallel plates, and as the plates moved closer together at a constant speed, the distance d at which the bent sample fractured was determined (Fig. 1, b). The plasticity measure εf was taken as the ratio
\[{\varepsilon _f} = \frac{h}{{d - h}},\]
where h is the thickness of the ribbon.
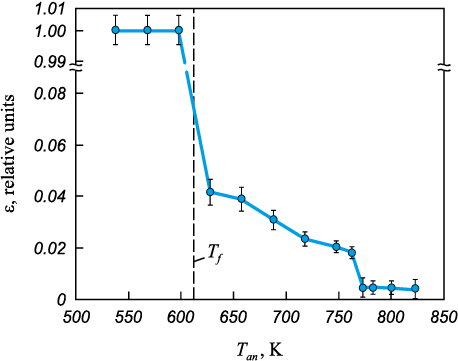
The ductile-to-brittle transition temperature Тf was calculated as the average temperature between Т1 and Т2 , where Т1 – is the highest annealing temperature at which εf = 1, and Т2 is the lowest recorded temperature at which a sharp decrease in plasticity occurs (εf → 0).
The crystallization temperature was assessed using differential scanning calorimetry on a DSC 8271 analyzer (Rigaku). The transition from the amorphous to crystalline state during heat treatment was monitored through X-ray structural analysis using the ULTIMA IV multifunctional diffractometer (Rigaku).
Results and discussion
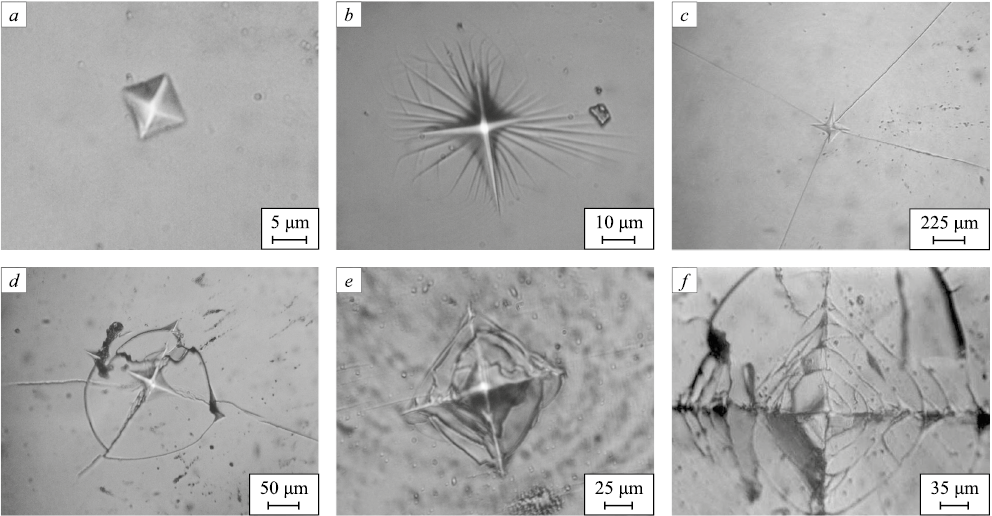
The experiment revealed that during the indentation of the Co70.5Fe0.5Cr4Si7B18 , amorphous alloys, as they transition from the amorphous to the crystalline state during annealing, there is a significant evolution in the micro-patterns of their deformation and fracture. Fig. 2 illustrates the variety of morphological modifications on the surface of the amorphous alloy following indentation with different loads.
Fig. 2. Atlas of deformation and fracture patterns of annealed Co70.5Fe0.5Cr4Si7B18 amorphous alloy |
As the alloy is heated, distinct patterns in the formation of deformation zones become apparent. In the temperature range Troom < 613 K, typical indenter imprints are observed at low loads, while at higher loads, the imprint is surrounded by shear bands (Fig. 2, a, b). Shear bands represent a phenomenon of plastic instability, where large shear deformations are localized within a relatively narrow band during material deformation. In the temperature range of 613 K ≤ Tan ≤ 748 K, straight radial cracks appear in the area of local loading on the amorphous alloy (Fig. 2, c). Some of these cracks may intersect with ring cracks (Fig. 2, d). Despite the embrittlement, plastic deformation of the amorphous alloy remains possible (with occasional shear bands) up to Tan = 748 K. Finally, in the heating range of 748 K < Tan ≤ 803 K, the imprints predominantly form a network of cracks oriented parallel to the faces of the indenter pyramid (Fig. 2, e). Additionally, ring cracks may form further away from the indentation zone (Fig. 2, f).
After indentation at the maximum load of P = 2 N, the annealing temperature Tcr , at which the first cracks formed and propagated in the amorphous alloy samples with a probability of no less than 0.5, was determined to be Tcr = 628 K [29]. The Tcr established on the elastic substrate effectively represents the ductile-to-brittle transition temperature of the amorphous alloy, closely matching the independent test data from U-bend testing of amorphous ribbons: Tf = 613 K (Fig. 3).
Fig. 3. Plasticity behavior of Co70.5Fe0.5Сr4Si7B18 amorphous alloy |
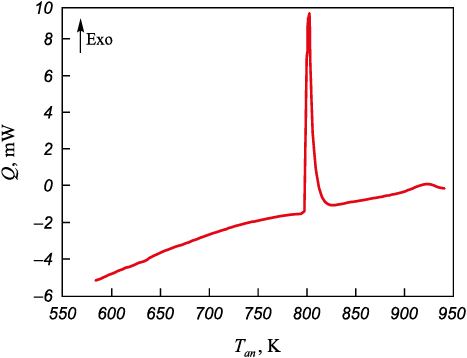
Subsequent attention was focused on calorimetric and structural studies to clarify the temperature ranges of phase transitions that the АA Co70.5Fe0.5Cr4Si7B18 amorphous alloy undergoes. According to DSC data, the crystallization temperature of the studied amorphous alloy is Tcrys = 803 K (Fig. 4).
Fig. 4. DSC curve of Co70.5Fe0.5Сr4Si7B18 amorphous alloy |
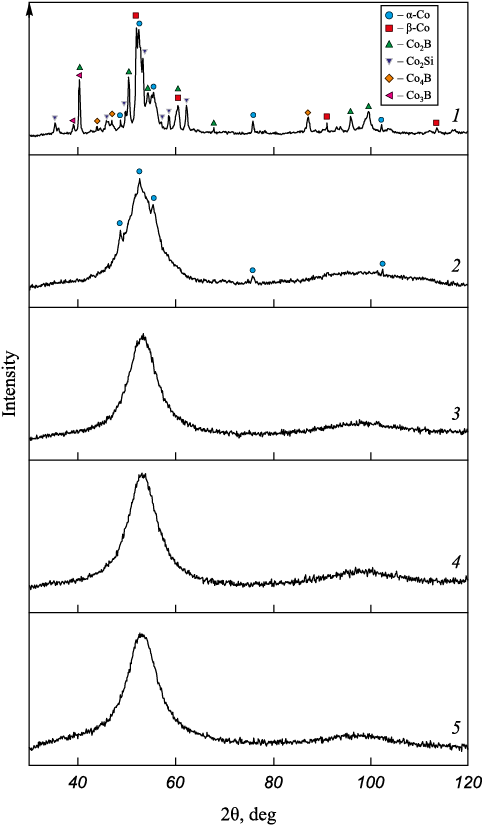
According to structural studies, the formation of the first nanocrystals in the amorphous matrix, corresponding to α-Co with an HCP lattice (a = b = 2.514 Å, c = 4.105 Å), occurs after annealing above 688 K [30]. As the temperature increases, an intensification of crystallization processes and an increase in the volumetric fraction of crystalline phases are observed. Along with α-Co, the β-Co phase with an FCC lattice (a = b = с = 3.554 Å), appears, as well as Co2Si, Co4B, Co3B, Co2B (Fig. 5).
Fig. 5. X-ray spectra of Co70.5Fe0.5Сr4Si7B18 amorphous alloy |
By comparing the morphological atlas of the surface of the annealed Co–Fe–Cr–Si–B amorphous alloy after indentation (Fig. 2) with the results of its structural changes (Figs. 4, 5), three temperature ranges can be distinguished. The transition from one range to another results in changes in the characteristic deformation and fracture patterns, which are a consequence of ongoing structural relaxation processes and subsequent crystallization [31].
• At Troom < Tf , the amorphous alloy demonstrates its unique plasticity, where even the maximum load on the indenter can only cause highly localized plastic deformation in the form of shear bands around the imprint.
• The temperature range Tf ≤ Tan ≤ Tsb is transitional, as no cracks form at lower temperatures (for Co70.5Fe0.5Сr4Si7B18 , the temper brittleness temperature is Tf = 613 K), and at higher temperatures, shear bands are absent (the temperature of complete disappearance of shear bands for Co70.5Fe0.5Cr4Si7B18 is Tsb = 748 K). In this temperature range, the amorphous alloy is still in an amorphous but embrittled state due to the ductile-to-brittle transition phenomenon. Therefore, large radial and ring cracks, as well as spalls, are observed.
• The range Tsb < Tan ≤ Tcrys corresponds to the final transformation of the amorphous alloy into a crystalline state (for Co70.5Fe0.5Cr4Si7B18 Tcrys = 803 K). A distinctive feature of this range is the formation of relatively symmetrical fracture patterns consisting of square crack networks nested within each other.
Conclusions
Using the example of melt-quenched amorphous alloy ribbons of the Co – Fe – Сr – Si – B system, it was demonstrated that indentation on an elastic substrate with different loads enables an approximate express assessment of the structural state of the amorphous alloy. This is due to the fact that the deformation and fracture zones formed under the indenter (presence/absence of shear bands, cracks, their mutual arrangement) are highly structure-sensitive and exhibit characteristic features in specific annealing temperature ranges.
Overall, indentation testing is an attractive method for studying the deformation behavior of amorphous alloys for the following reasons. First, these tests are easy to perform and do not lead to macrofracture, as they are not specific to the sample size. Second, plastic deformation in the material is locally confined, facilitating the study of plastic flow in the zones surrounding and located under the indenter. Moreover, direct comparison of indentation results with responses, such as to bending or tension, further makes the indentation method an effective “probe” for understanding the physics of plastic deformation and fracture in amorphous alloys.
References
1. Amorphous and Nanocrystalline Materials: Preparation, Properties, and Applications. Inoue A., Hashimoto K. eds. Berlin, Heidelberg, Germany: Springer; 2001:206. https://doi.org/10.1007/978-3-662-04426-1
2. Chen H.S. Glass temperature, formation and stability of Fe, Co, Ni, Pd and Pt based glasses. Materials Science and Engineering. 1976;23(2–3):151–154. https://doi.org/10.1016/0025-5416(76)90185-3
3. Inoue A. Stabilization of metallic supercooled liquid and bulk amorphous alloys. Acta Materialia. 2000;48(1):279–306. https://doi.org/10.1016/S1359-6454(99)00300-6
4. Louzguine-Luzgin D.V. Structural changes in metallic glass-forming liquids on cooling and subsequent vitrification in relationship with their properties. Materials. 2022;15(20):7285. https://doi.org/10.3390/ma15207285
5. Li F.C., Liu T., Zhang J.Y., Shuang S., Wang Q., Wang A.D., Wang J.G., Yang Y. Amorphous-nanocrystalline alloys: Fabrication, properties, and applications. Materials Today Advances. 2019;4:100027. https://doi.org/10.1016/j.mtadv.2019.100027
6. Glezer A.M., Permyakova I.E. Melt-Quenched Nanocrystals. Boca Raton, FL, USA: CRC Press, Taylor & Francis Group; 2013:369. https://doi.org/10.1201/b15028
7. Halim Q., Mohamed N.A.N., Rejab M.R.M., Naim W.N.W.A., Ma Q. Metallic glass properties, processing method and development perspective: A review. The International Journal of Advanced Manufacturing Technology. 2021;112(5–6): 1231–1258. https://doi.org/10.1007/s00170-020-06515-z
8. Abrosimova G.E., Matveev D.V., Aronin A.S. Nanocrystal formation in homogeneous and heterogeneous amorphous phases. Physics-Uspekhi. 2022;65:227–244. (In Russ.). https://doi.org/10.3367/UFNr.2021.04.038974
9. Permyakova I., Glezer A. Mechanical behavior of Fe- and Co-based amorphous alloys after thermal action. Metals. 2022;12(2):297. https://doi.org/10.3390/met12020297
10. McHenry M.E., Willard M.A., Laughlin D.E. Amorphous and nanocrystalline materials for application as soft magnet. Progress in Materials Science. 1999;44(4):291–433. https://doi.org/10.1016/S0079-6425(99)00002-X
11. Gheiratmand T., Madaah Hosseini H.R. Finemet nanocrystalline soft magnetic alloy: Investigation of glass forming ability, crystallization mechanism, production techniques, magnetic softness and the effect of replacing the main constituents by other elements. Journal of Magnetism and Magnetic Materials. 2016;408(19):177–192. https://doi.org/10.1016/j.jmmm.2016.02.057
12. Glezer A.M., Potekaev A.I., Cheretaeva A.O. Thermal and Time Stability of Amorphous Alloys. Boca Raton, FL, USA: CRC Press, Taylor & Francis Group; 2017:180. https://doi.org/10.1201/9781315158112
13. Schuh C.A., Hufnagel T.C., Ramamurty U. Mechanical behavior of amorphous alloys. Acta Materialia. 2007;55(12): 4067–4109. https://doi.org/10.1016/j.actamat.2007.01.052
14. Trexler M.M., Thadhani N.N. Mechanical properties of bulk metallic glasses. Progress in Materials Science. 2010; 55(8):759–839. https://doi.org/10.1016/j.pmatsci.2010.04.002
15. Khonik V., Kobelev N. Metallic glasses: A new approach to the understanding of the defect structure and physical properties. Metals. 2019;9(5):605. https://doi.org/10.3390/met9050605
16. Alekhin V.P., Khonik V.A. Structure and Physical Regularities of Deformation of Amorphous Alloys. Moscow: Metallurgy; 1992:248. (In Russ.).
17. Kekalo I.B. Structural Relaxation Processes and Physical Properties of Amorphous Alloys. Moscow: MISiS; 2016;2:834. (In Russ.).
18. Burgess T., Ferry M. Nanoindentation of metallic glasses. Materials Today. 2009;12(1–2):24–32. https://doi.org/10.1016/S1369-7021(09)70039-2
19. Golovin Yu.I., Ivolgin V.I., Khonik V.A., Kitagawa K., Tyurin A.I. Serrated plastic flow during nanoindentation of a bulk metallic glass. Scripta Materialia. 2001;45(8):947–952. https://doi.org/10.1016/S1359-6462(01)01116-2
20. Jain A., Prabhu Y., Gunderov D., Ubyivovk E.V., Bhatt J. Study of micro indentation assisted deformation on HPT processed Zr62Cu22Al10Fe5Dy1 bulk metallic glass. Journal of Non-Crystalline Solids. 2021;566(12):120877. https://doi.org/10.1016/j.jnoncrysol.2021.120877
21. Jana S., Ramamurty U., Chattopadhyay K., Kawamura Y. Subsurface deformation during Vickers indentation of bulk metallic glasses. Materials Science and Engineering: A. 2004;375–377:1191–1195. https://doi.org/10.1016/j.msea.2003.10.068
22. Schuh C.A., Nieh T.G. A survey of instrumented indentation studies on metallic glasses. Journal of Materials Research. 2004;19(1):46–57. https://doi.org/10.1557/jmr.2004.19.1.46
23. Glezer A.M., Permyakova I.E. Modern concepts of methods for studying mechanical properties of metallic glasses (REVIEW). Deformatsiya i razrushenie materialov. 2006;(3):2–11. (In Russ.).
24. Greer A.L., Cheng Y.Q., Ma E. Shear bands in metallic glasses. Materials Science and Engineering: R: Reports. 2013;74(4):71–132. https://doi.org/10.1016/j.mser.2013.04.001
25. Axinte E.M., Wang Y., Tabacaru L.L., Radwan N. Shear banding in metallic glasses: major weakness or potential advantage? Recent Patents on Materials Science. 2016;9(1):2–19. https://doi.org/10.2174/1874464809666160407212236
26. Wilde G., Rösner H. Nanocrystallization in a shear band: An in situ investigation. Applied Physics Letters. 2011; 98(25):251904. https://doi.org/10.1063/1.3602315
27. Jiang M.Q., Wilde G., Dai L.H. Shear band dilatation in amorphous alloys. Scripta Materialia. 2017;127:54–57. https://doi.org/10.1016/j.scriptamat.2016.08.038
28. Bhowmick R., Raghavan R., Chattopadhyay K., Ramamurty U. Plastic flow softening in a bulk metallic glass. Acta Materialia. 2006;54(16):4221–4228. https://doi.org/10.1016/j.actamat.2006.05.011
29. Feodorov V., Permyakova I., Ushakov I. Evolution of mechanical characteristics of a metallic glass Co–Fe–Cr–Si at annealing. Proceedings of SPIE (The International Society for Optical Engineering). 2005;5831:143–147. https://doi.org/10.1117/12.619685
30. Permyakova I.E., Glezer A.M., Savchenko E.S., Shchetinin I.V. Effect of external actions on magnetic properties and corrosion resistance of Co70.5Fe0.5Сr4Si7B18 amorphous alloy. Bulletin of the Russian Academy of Sciences: Physics. 2017;81(11):1310–1316. (In Russ.). https://doi.org/10.3103/S1062873817110144
31. Permyakova I.E. Evolution of the structure, properties of amorphous alloys and amorphous-nanocrystalline composite materials under external influences: Dr. Tech. Sci. Diss. Moscow: Baikov Institute of Metallurgy and Materials Science; 2023:267.
About the Authors
I. E. PermyakovaRussian Federation
Inga E. Permyakova, Dr. Sci. (Phys.-Math.), Senior Researcher of the Laboratory “Physicochemistry and Mechanics of Metallic Materials”
49 Leninskii Ave., Moscow 119334, Russian Federation
M. V. Kostina
Russian Federation
Mariya V. Kostina, Dr. Sci. (Eng.), Assist. Prof., Senior Researcher, Head of the Laboratory “Physicochemistry and Mechanics of Metallic Materials”
49 Leninskii Ave., Moscow 119334, Russian Federation
Review
For citations:
Permyakova I.E., Kostina M.V. Deformation and fracture of heat treated ribbon of amorphous Co – Fe – Cr – Si – B alloy during indentation. Izvestiya. Ferrous Metallurgy. 2024;67(5):556-562. https://doi.org/10.17073/0368-0797-2024-5-556-562


