Scroll to:
Investigating effectiveness of changing calibration of input cone of rolls and lines of a piercing mill with tapered rolls using computer modeling
https://doi.org/10.17073/0368-0797-2024-1-106-111
Abstract
Screw piercing of a workpiece is a process with complex cyclical nature of metal flow in deformation center. Setting up the deformation tool and its calibration, as well as the accuracy of the workpiece feed and release of the hollow billet from deformation zone, have a significant impact on the quality of the hollow billet: dimensional accuracy and presence of defects on its inner and outer surface. In the paper, a technical solution was proposed to increase the stability of piercing a continuously cast workpiece on screw rolling mills. Implementation of the idea involves the use of an improved calibration of the piercing mill tool. For both in order to achieve the workpiece alignment and its stable feeding along rolling axis of the piercing mill, it was proposed to add a special thickening (hump) on the roll input cone and to change calibration of its input section on the ruler in order to meet the workpiece with the rolls earlier: before the initial capture of the workpiece by the rolls, that is, before deformation of metal of the continuously cast workpiece by the rolls. To check and correct the proposed solution, the tasks of FEM-modeling of screw piercing process with a modified design of the tapered roll and ruler were set and solved using the QForm 3D software package. Results of the finite element modeling (FEM) showed that the use of improved tool calibration makes it possible to improve the alignment of the workpiece and ensure its stable position along the rolling axis of the piercing mill, thereby reducing the runout of the workpiece in the deformation center and thereby reducing the force on the rolls from 8 to 5 MN. The results of measurements of the hollow billets’ geometric parameters obtained by FEM showed insignificant relative deviations that fit within the regulatory limits.
Keywords
For citations:
Panasenko O.A., Khalezov A.O., Nukhov D.Sh. Investigating effectiveness of changing calibration of input cone of rolls and lines of a piercing mill with tapered rolls using computer modeling. Izvestiya. Ferrous Metallurgy. 2024;67(1):106-111. https://doi.org/10.17073/0368-0797-2024-1-106-111
Introduction
The critical step in producing hot-worked seamless pipes involves transforming a solid workpiece into a hollow billet [1 – 3]. The most effective method for this, both in terms of productivity and the accuracy of the hollow billet’s geometry, is screw piercing of continuous cast workpieces (CCW) using rotary piercers [4 – 6]. The screw rolling process is modern and holds great promise; however, it is also exceptionally complex [7; 8]. This complexity arises from the unique way metal flows in the deformation zone, which makes the process particularly challenging [9; 10]. During screw rolling, the workpiece undergoes simultaneous rotation, axial movement, and radial compression by the rolls [2]. As a result, screw rolling is seen as a process with uncertain boundary conditions and a cyclic nature of deformation [5]. The setup and calibration of the deformation tool, along with the precision of the workpiece feed and the release of the hollow billet from the deformation zone, significantly affect its quality. This includes the dimensional accuracy and the presence of defects on its inner and outer surfaces [11 – 14].
Peculiarity of the workpiece feeding into the piercing mill and its impact on the hollow billet quality
It is widely recognized that for a stable piercing process at the rotary piercers, it is crucial to meet the conditions for initial and secondary capture, as well as to ensure the reliable completion of the piercing process when the hollow billet is released from the mill rolls [1 – 3]. In practice, however, achieving capture can be challenging. The study mentioned in [3] highlights that to guarantee the forward and rotational movement of the workpiece during its initial capture by the rolls, an external axial force must be applied to the workpiece’s rear end. In this scenario, the pushing force should be applied to the workpiece until its circumferential velocity hits a critical point. At this juncture, the metal is axially fed into the rolls, and both the speed and force of the device pushing the workpiece into the rolls should be kept to a minimum [3].
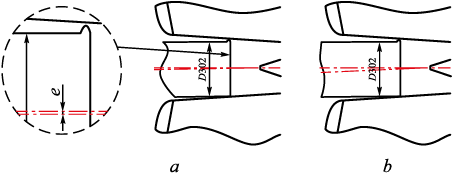
Moreover, during its initial capture by the rolls of the piercing mill, the workpiece exhibits a considerable degree of movement freedom. This is partly because the entry guide is manufactured to a set tolerance for the inner diameter, and the working surface that supports the workpiece is subject to wear (Fig. 1). These factors lead to an increase in wall thickness variation and the out-of-roundness of the hollow billet’s front end [14 – 16]. The deviation of the workpiece from the rolling axis, as shown in Fig. 1, can be exacerbated by the curvature of the continuous cast workpieces (CCW) themselves, as well as by lapping or burrs on their front face.
Fig. 1. Misalignment of the workpiece from rolling axis during the primary capture: |
Therefore, the stability of the piercing process in its early stages is compromised by two main issues: the failure to adhere to the required workpiece feeding mode and the inadequacies of the existing feeding devices.
To improve the alignment of the workpiece and ensure its stable feeding along the rolling axis of the EZTM piercing mill at Tube Rolling Shop-1 of JSC Seversky Pipe Plant, a novel approach was suggested. This method involves adding a special thickening, or hump, on the roll input cone, along with adjusting the calibration of its input section on the guide shoe. The aim is for the workpiece to engage with the rolls sooner – before the initial capture of the workpiece by the rolls, and thus before the deformation of the CCW metal by the rolls.
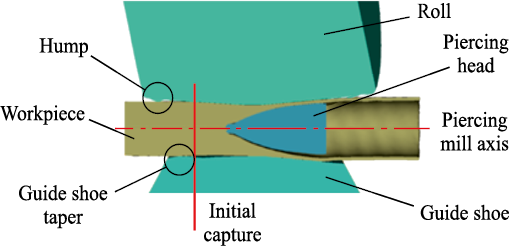
To achieve this, an additional tapered section is introduced on the roll input cone. This section extends from the roll end to the point where the workpiece is first captured by the mill rolls and is aligned parallel to the rolling axis (assuming the rolls are rotated to the necessary angle for rolling and feeding). This design is intended to keep the workpiece centered within the deformation zone of the EZTM piercing mill, thereby enhancing the stability of the workpiece’s initial capture by the rolls (Fig. 2).
Fig. 2. Center of deformation during piercing |
Verification of the technical solution to enhance the stability of the screw piercing process in the mill with tapered rolls
To validate and refine the proposed solution, tasks involving the FEM modeling of the screw piercing process at the rotary piercer with a modified design of the tapered roll and guide shoe were set up and conducted using the QForm 3D software package. This approach enabled the identification of workpiece shape change patterns within the deformation zone and facilitated the assessment of the hollow billet’s dimensional accuracy [17].
To facilitate these tasks, a solid model of the piercing mill was developed using CAD modeling software, specifically KOMPAS-3D. The solid models of the rolls, guide shoes, and the piercing head for the EZTM mill were prepared, aligning with the technological guidelines provided by JSC Seversky Pipe Plant. For the modeling process, a workpiece with a diameter of 290 mm was used. The positioning of the tools was determined based on the technological parameters of the piercing mill’s configuration, as practiced at the production facility (refer to the Table).
Settings of the piercing mill
| ||||||||||||||||
As the modeling tasks were established, the following assumptions were made.
• The workpiece is 1000 mm long.
• The material of the workpiece is solid, isotropic, and incompressible AISI 1045 steel (equivalent to steel 45), for which the necessary parameters are available in the QForm 3D software database.
• In line with the specifications, the workpiece’s temperature is set at 1200 °C, and the temperature of the working tools at 50 °C.
• The friction between the workpiece and the tool surfaces is described by the Siebel friction law: τ = ψτs , where τ is the friction stress, MPa, ψ is the friction index, and τs is the shear deformation resistance of the material. For the surfaces in contact with the rolls, the friction index is presumed to be 0.8, while for those in contact with the piercing head and guide shoe, it’s assumed to be 0.4 [5].
These assumptions were chosen to expedite the calculation process and are considered not to significantly affect the study’s objectives. The solid model showcasing the workpiece piercing process and the process’s initial stage, as visualized in the QForm 3D software, is illustrated in Fig. 3.
Fig. 3. Solid-state model of the workpiece piercing (a) and the initial stage |
The results from the tasks solved using the QForm 3D software revealed several positive outcomes from applying the improved tool calibration:
– the stable initial capture of the workpiece by the mill rolls is achieved;
– significant compression of the workpiece in the deformation zone does not result in the premature opening of the CCW internal cavity;
– a consistent secondary capture without any workpiece runout in the deformation zone is assured.
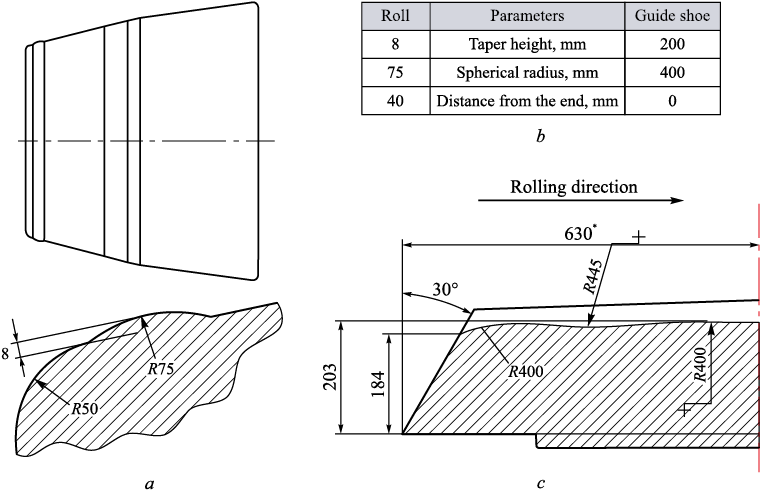
As the calibration was refined, the optimal parameters for the input cone of rolls and guide shoes were determined (Fig. 4).
Fig. 4. Parameters of the hump on the roll and ruler: |
The force graph on the rolls of the piercing mill validates that the calibration was accurately performed (Fig. 5).
Fig. 5. Graphs of force on the piercing mill rolls during computer modeling: |
This enhanced tool calibration effectively minimizes workpiece runout along the piercing axis, as evidenced by a considerable reduction in the piercing force (Fig. 5). The graphs demonstrate that piercing the workpiece with improved tool calibration can reduce the force exerted on the rolls from 8 to 5 MN.
The results of the FEM measurements for the hollow billets’ geometric parameters revealed minor relative deviations:
– the average outside diameter did not surpass 0.8 % (within the standard tolerance of ±1 %);
– the wall thickness deviations did not exceed 1.4 % (with a standard tolerance of ±5 %).
Blanks refined with improved roll and guide shoe calibration have been successfully tested at the EZTM piercing mill and are now being utilized to manufacture hollow billets in Shop No. 1 of JSC Seversky Pipe Plant.
Conclusions
The paper proposes a technical solution to enhance the stability of piercing CCW on screw rolling mills. It suggested adding a special thickening (hump) on the roll input cone and altering the calibration of its input section on the guide shoe, enabling the workpiece to engage with the rolls sooner – before the initial capture and prior to the deformation of CCW metal by the rolls.
To evaluate and refine this solution, tasks for FEM modeling of the screw piercing process with a redesigned tapered roll and guide shoe were established and completed.
The FEM modeling results confirmed that utilizing improved tool calibration could significantly reduce workpiece runout in the deformation zone and lower the force on the rolls from 8 to 5 MN. The FEM-derived measurements of the hollow billets’ geometric parameters showed negligible relative deviations, all within acceptable regulatory standards.
References
1. Potapov I.N. Theory of Pipe Production. Moscow: Metallurgiya; 1991:424. (In Russ.).
2. Danilov F.A. Hot Rolling and Pressing of Pipes. Moscow: Metallurgiya; 1972:591. (In Russ.).
3. Teterin P.K. Theory of Transverse and Screw Rolling. Moscow: Metallurgiya; 1972:270. (In Russ.).
4. Osadchii V.Ya. Production and Quality of Steel Pipes: A Textbook for Universities. Moscow: MSUPI; 2012:370. (In Russ.).
5. Bogatov A.A. Screw Rolling of Continuously Cast Billets from Structural Steel Grades: A Textbook. Yekaterinburg: UrFU; 2017:164. (In Russ.).
6. Wei Z., Wu C. A new analytical model to predict the profile and stress distribution of tube in three-roll continuous retained mandrel rolling. Journal of Materials Processing Technology. 2022;302:117491. https://doi.org/10.1016/j.jmatprotec.2022.117491
7. Gamin Yu.V., Galkin S.P., Romantsev B.A., Koshmin A.N., Goncharuk A.V., Kadach M.V. Influence of radial-shear rolling conditions on the metal comsumption rate and properties of D16 aluminum alloy rods. Metallurgist. 2021; 65(5-6):650–659. https://doi.org/10.1007/s11015-021-01202-0
8. Topa A., Kim D.K., Kim Y. 3D numerical simulation of seamless pipe piercing process by fluid-structure interaction method. MATEC Web of Conferences. 2018;203:06016. https://doi.org/10.1051/matecconf/201820306016
9. Romantsev B.A., Skripalenko M.M., Ba Huy Tran, Skripalenko M.N., Gladkov Yu.A., Gartvig A.A. Computer simulation of piercing in a four-high screw rolling mill. Metallurgist. 2018:61(9–10):729–735. http://doi.org/10.1007/s11015-018-0556-7
10. Skripalenko M.M., Rogachov S.O., Romantsev B.A., Bazhenov V.E., Skripalenko M.N., Danilin A.V. Microstructure and hardness of hollow tube shells at piercing in two-high screw rolling mill with different plugs. Materials. 2022;15(6):2093. https://doi.org/10.3390/ma15062093
11. Nguyen Q., Aleshchenko A.S. Research on the mandrel wear of a screw rolling piercing mill by the finite element method. Key Engineering Materials. 2022;910:381–387. https://doi.org/10.4028/p-4m4o75
12. Goncharuk A.V., Fadeev V.A., Kadach M.V. Seamless pipes manufacturing process improvement using mandreling. Solid State Phenomena. 2021;316:402–407. https://doi.org/10.4028/www.scientific.net/SSP.316.402
13. Rotenberg Zh.Ya., Budnikov A.S. Modernization of screw rolling technology in a multi-roll mill. Izvestiya. Ferrous Metallurgy. 2022;65(1):28–34. (In Russ.). https://doi.org/10.17073/0368-0797-2022-1-28-34
14. Pavlova M.A., Zvonarev D.Yu., Akhmerov D.A. QFORM-based research how the accuracy settings of piercing mill centering units axis influences hollow shell thickness. Bulletin of the South Ural State University. Series: Metallurgy. 2021;(4):56–62. (In Russ.).
15. Galkin S.P., Aleshchenko A.S., Romantsev B.A., Gamin Yu.V., Iskhakov R.V. Effect of preliminary deformation of continuously cast billets by radial-shear rolling on the structure and properties of hot-rolled chromium-containing steel pipes. Metallurgist. 2021;65(1–2):9–12. https://doi.org/10.1007/s11015-021-01147-4
16. Toporov V.A., Tolmachev V.S., P’yankov B.G., Bushin R.O., Panasenko O.A., Ibragimov P.A. Method of obtaining hollow sleeves on a sewing mill. Patent RF no. 2578887. MPK B21B19/04. Bulleten’ izobretenii. 2016;(33). (In Russ.).
17. Toporov V.A., Stepanov A.I., Panasenko O.A., Ibragimov P.A. Use of finite-element modeling to improve the piercing operation on a piercing mill. Metallurgist. 2014; 58(7–8):563–567. http://doi.org/10.1007/s11015-014-9954-7
About the Authors
O. A. PanasenkoRussian Federation
Oleg A. Panasenko, Head of the Pipe Rolling Laboratory of the Research Center
7 Vershinina Str., Polevskoi, Sverdlovsk Region 623388, Russian Federation
A. O. Khalezov
Russian Federation
Aleksandr O. Khalezov, Postgraduate of the Chair “Metal Forming”
19 Mira Str., Yekaterinburg 620002, Russian Federation
D. Sh. Nukhov
Russian Federation
Danis Sh. Nukhov, Cand. Sci. (Eng.), Assist. Prof. of the Chair “Metal Forming”
19 Mira Str., Yekaterinburg 620002, Russian Federation
Review
For citations:
Panasenko O.A., Khalezov A.O., Nukhov D.Sh. Investigating effectiveness of changing calibration of input cone of rolls and lines of a piercing mill with tapered rolls using computer modeling. Izvestiya. Ferrous Metallurgy. 2024;67(1):106-111. https://doi.org/10.17073/0368-0797-2024-1-106-111


