Scroll to:
Structure and its defects in additive manufacturing of stainless steels by laser melting and electric arc surfacing
https://doi.org/10.17073/0368-0797-2024-1-65-72
Abstract
Currently, there is an active development and study of additive technologies. Metal 3D printing makes it possible to obtain parts and structures of complex configuration using a minimum of shaping operations, which can lead to a reduction in overall cost of the resulting products. In this paper, we studied the structure formation in manufacture of products made of stainless steels 10Cr12Ni10Ti (analogue of AISI 321) and 08Cr18Ni9 (analogue of AISI 304) by additive methods – SLM (Selective Laser Melting) and WAAM (Wire Arc Additive Manufacturing). In the course of microstructural analysis, it was found that during the manufacture of products using SLM technology, small austenitic grains oriented in the direction of heat removal are formed, and with WAAM method, austenite is formed mainly in form of dendrites. It is shown that porosity is formed during manufacture of the samples by SLM method, which is associated with non-melting of individual powder particles. When implementing additive manufacturing by WAAM (electric arc surfacing), there is no increased porosity. In the course of the study, a new defect of the structure formed during the manufacture of products by both methods was revealed – formation of interface boundaries between layers, which is associated with the technology of additive manufacturing itself. When manufacturing a WAAM product, it manifests itself more clearly than when obtaining metal by SLM. Boundaries of the surfacing rollers in the manufacture of products by SLM accumulate various intermetallides and structural defects more intensively, relative to WAAM. As a result of the small relative volume of one surfacing roller, compared with WAAM, accumulation of these defects and intermetallides can act as an effective barrier during movement of dislocations, which can lead to an increase in the strength properties of products.
For citations:
Kabaldin Yu.G., Chernigin M.A. Structure and its defects in additive manufacturing of stainless steels by laser melting and electric arc surfacing. Izvestiya. Ferrous Metallurgy. 2024;67(1):65-72. https://doi.org/10.17073/0368-0797-2024-1-65-72
Introduction
Additive technologies represent a burgeoning trend in digital technologies today [1 – 7]. However, the terminology for this trend has yet to be standardized, not only in Russia but globally. Currently, Russia is actively developing specialized GOST standards, which are partially harmonized with ISO and ASTM standards and, in some respects, surpass them.
Among the various technologies for additive manufacturing (AM) of products, Selective Laser Melting (SLM) and Wire Arc Additive Manufacturing (WAAM) techniques stand out as the most popular.
SLM is an additive production method that manufactures parts from an electronic geometric pattern by surfacing metal raw materials with laser radiation [1 – 6]. Both powder and wire can serve as the metal raw material.
Recently, Wire Arc Additive Manufacturing (WAAM) has also gained significant prominence. WAAM [5 – 8] has demonstrated the highest efficiency (up to 15 kg/h) and the capability to produce large-sized items. Domestic manufacturing companies are quite familiar with this technology, as electric arc surfacing and welding are commonplace in nearly any metal-involved production process.
It should be noted that in Russia, both technologies are relatively understudied, particularly in terms of defect formation during their application [1 – 2] during their implementation, which results in a drop of the metal mechanical properties. which leads to a degradation of the metal’s mechanical properties. Therefore, the objective of this work is to investigate defect formation during the additive manufacturing of products (samples) using these methods.
Materials and methods
Stainless steels are widely used in additive manufacturing due to their special properties [6; 9; 10], such as good weldability and corrosion resistance.
In this study, we examined stainless steels 12Cr18Ni10T and 08Cr18Ni9, which have an FCC structure. These materials are particularly favored for their layer weldability and melt fluidity.
The samples were manufactured using the SLM method, employing powder from 10Cr18Ni10Ti steel with spherical particles ranging from 50 to 80 μm in size. Various initial powders were used to produce several samples (samples 1 and 2). While both samples were surfaced using powder from the same manufacturer, sample 1 utilized powder from a newly opened package, whereas sample 2 used powder from a previously opened package. The chemical composition of the materials is provided in Table 1.
Table 1. Chemical composition of the samples obtained by SLM, %
|
In the additive manufacturing process of the samples using the WAAM method, welding wire Sv-08Cr18Ni9 (ER308Lsi) was employed.
The test samples were produced in the form of bars on a Rusmelt 300M printer using the SLM method.
The WAAM blanks were manufactured as walls on a specially designed experimental bench. The papers [6; 11] describe a 3D printing technology utilizing electric arc surfacing, and the method employed on the bench is protected by patent RU 2696121С1. The 3D printing process was investigated with gas torch travel speeds of 350 and 400 mm/min in a CO2 shielding gas environment. The surfacing heat input varied within the range of 150 – 1200 J/mm.
Metallographic sections were prepared from the obtained samples to determine the structure of the printed blanks. The sections were mechanically sanded using sandpaper of varying grits and polished with pastes. A solution consisting of 5 cm3 HNO3 , 50 cm3 HCl, and 50 cm3 H2O was used as a chemical etching reagent, following recommendations from reference sources [12 – 14].
Structural analysis was conducted using a KEYENCEVHX-1000 optical microscope. The fractographic investigation was conducted using a Tescan Vega 3 scanning electron microscope. The metal’s chemical composition was analyzed using an ARL 3460 spectrometer.
Experimental studies
The optical emission analysis of the WAAM samples indicated negligible carbon and silicon loss. This phenomenon is attributed to the characteristics of the sample manufacturing technology and is typical of foundry and welding operations. Table 2 displays the chemical composition of the initial wire made from stainless steel 08Cr18Ni9 and the sample produced by the WAAM method.
Table 2. Chemical composition of 08Cr18Ni9 wire
| ||||||||||||||||||||||||||||||||||||||||||||||||
According to Table 2, although the percentage content of several elements decreases during additive manufacturing, it remains within acceptable limits.
Typically, metal powders utilized for manufacturing products via the SLM method possess a high surface area, which inevitably results in sample porosity and the transfer of adsorbed contaminating agents from the powder surface into the finished product. Therefore, it was imperative to primarily investigate the porosity of the blanks and the structure of the metal produced by the SLM method.
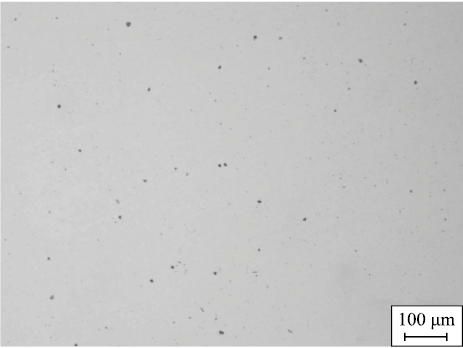
We examined the surface of unetched sections manufactured by the SLM method to study the formation of metal porosity and contamination by non-metallic inclusions (Fig. 1). On several samples, metal porosity did not increase during the study. The degree of metal contamination with non-metallic inclusions was determined on the microsection at a magnification of 100 in accordance with GOST 1778 – 70. The results of the test for contamination with non-metallic inclusions are presented in Table 3.
Fig. 1. Unetched section of sample 1 obtained by SLM
Table 3. Points of contamination of the section with various
|
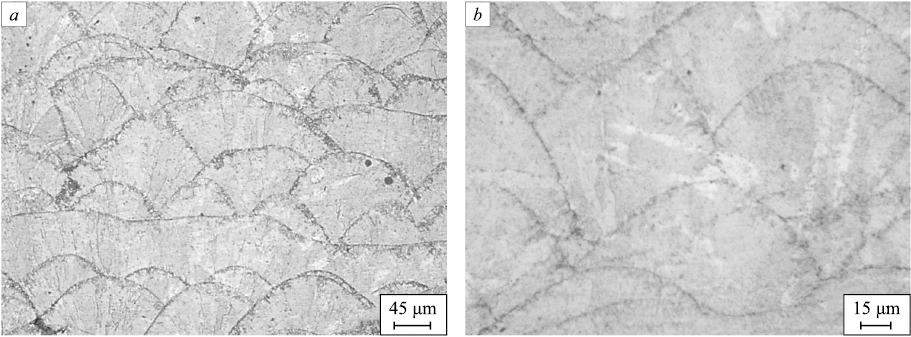
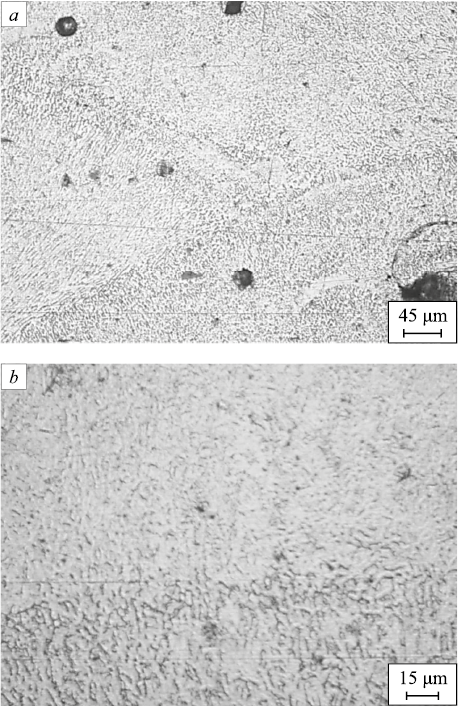
Metallographic examination of the sample in the direction transverse to surfacing reveals sharp boundaries of surfacing rollers (Fig. 2). There are no pronounced signs of a dendritic structure characteristic of metal after 3D printing.
Fig. 2. Structure of sample 1 obtained by SLM: |
In general, the structure of the deposited metal formed by the SLM method comprises relatively small austenitic grains oriented in the direction of heat removal, with distinctly observed austenitic twins (Fig. 2). Closer to the boundaries where the layers melt, the structure appears refined, displaying abnormally small austenitic grains also oriented in the direction of heat removal.
The microstructural analysis data obtained align with results presented in the works of other authors [15 – 18].
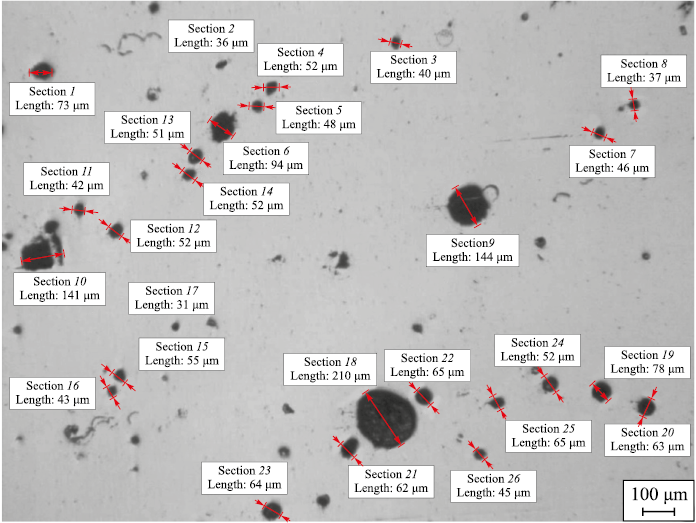
Examination of sample 2 revealed the presence of large individual pores and clusters thereof, as well as shrinkage cavities [19]. All identified discontinuity flaws are typical defects formed during metal casting or welding.
The average size of these discontinuity flaws was calculated at a magnification of 50 at various points on the unetched polished section, amounting to 94 μm (Fig. 3). Clusters of discontinuity flaws of this size can potentially exert a negative impact on the mechanical properties of the product.
Fig. 3. Unetched section of sample 2 obtained by SLM |
Currently, the heightened porosity observed in samples obtained through the SLM method is attributed to powder contamination with various impurities or the explosive melting of powder particles. It is evident that the feedstock used in manufacturing sample 2 may have been contaminated. The identified defects can be classified as typical flaws associated with this technology [20].
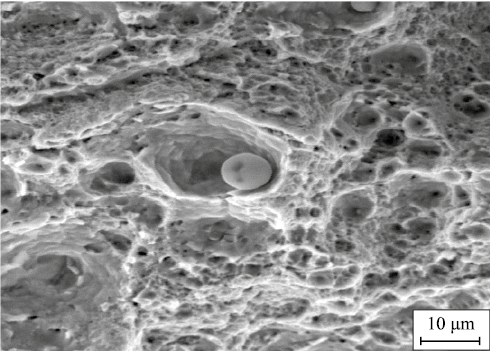
Fig. 4 illustrates an electron fractogram depicting the presence of spherical particles of unmelted powder of 12Cr18Ni10T steel on the fracture surface of sample 2.
Fig. 4. Fractogram of the fracture of sample 2 obtained by SLM after its stretching
Fig. 5. Structure of sample 2 obtained by SLM: |
Consequently, the metal of products manufactured by the SLM method tends to be porous primarily because powder particles fail to melt, either due to powder contamination or incorrect processing parameters.
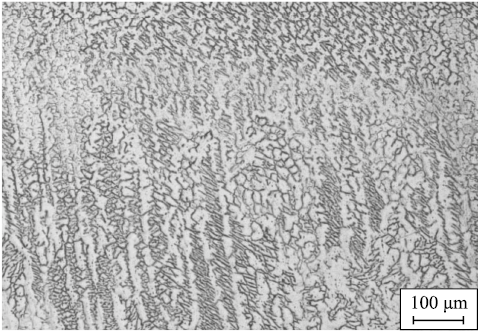
The structure of the welded metal exhibits dendritic characteristics. Near the fusion boundary, the dendrites typically orient themselves towards it, possibly influenced by temperature gradients. In the interior of the deposited metal, dendrites are randomly arranged. Irregular dendrites are shorter than their normally oriented counterparts, yet they possess a more developed boundary structure. Overall, the structure of the deposited metal bears resemblance to the microstructure resulting from the crystallization of austenitic steel.
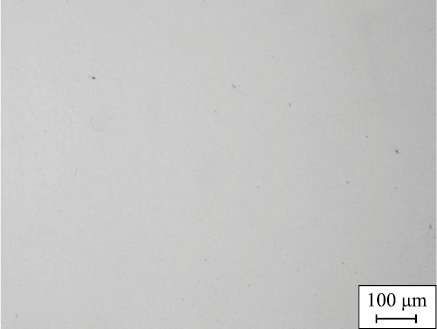
The metallographic analysis of sections from samples made of 08Cr18Ni9 steel via the WAAM method revealed minimal porosity. Fig. 6 depicts an unetched sample section. The level of metal contamination with non-metallic inclusions was assessed on the microsection at a magnification of 100 in accordance with GOST 1778 – 70. The findings regarding contamination with non-metallic inclusions are detailed in Table 4.
Fig. 6. Unetched section of the sample obtained by WAAM
Table 4. Points of contamination of the section with various
|
Fig. 7 illustrates the microstructure of the metal produced via the WAAM method under optimal 3D printing conditions. The deposited metal’s structure exhibits dendritic characteristics and changes as it moves from the fusion boundary into the depth of the deposited metal from cellular-dendritic to predominantly dendritic with a disordered orientation. Overall, the structure of the deposited metal bears resemblance to the microstructure resulting from the crystallization of austenitic steel or by additive manufacturing with other methods.
Fig. 7. Microstructure of metal of the sample obtained by WAAM |
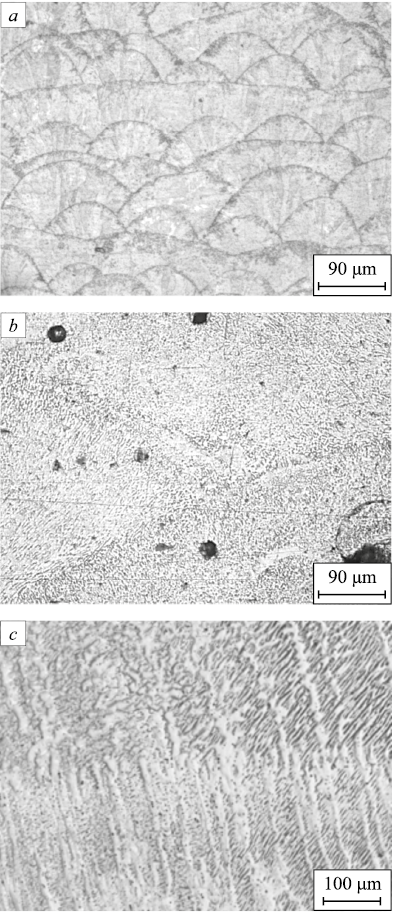
Fig. 8 presents micrographs of the interface boundaries of displays micrographs of the interface boundaries of samples manufactured by both the WAAM and SLM methods, where porosity is also detected at these boundaries between layers.
Research findings indicate that the interface boundaries formed between layers introduce high internal stresses into the product. The WAAM method is characterized by greater internal stresses resulting from these interface boundaries compared to the SLM method. This discrepancy is attributed to the differing thicknesses of the layers generated by each method. In the SLM method, layers are typically 0.2 – 0.5 mm thick, whereas in the WAAM method, layers range from 0.8 – 0.9 mm thick.
Fig. 8. Micrographs of metal interface of the samples: |
Another undesired defect observed in additive manufacturing of steels is the presence of the δ- and σ-phases. However, X-ray diffraction analysis [8] revealed that their content in samples produced by both methods does not exceed 4 %, remaining within acceptable limits.
In traditional welding technology, the weld often weakens the overall structure. However, metal produced by the SLM method exhibits greater strength than rolled steel. This effect is corroborated by several studies and can be attributed to the relatively small space occupied by each surfacing roller in relation to the entire deposited metal. This allows various intermetallides to concentrate within the roller, which, due to rapid cooling rates, do not have sufficient time to completely transform into welding slag and thus remain embedded within the metal surface – a phenomenon not observed in WAAM surfacing. The accumulation of various intermetallides and potential structural defects is clearly evident in Fig. 8, а, b. When samples obtained by the SLM method undergo stretching, defects and intermetallides accumulated along the boundaries of surfacing rollers can effectively impede dislocation motion. Consequently, this impediment results in enhanced strength properties.
Conclusions
The structure of stainless steels produced by the SLM method is austenitic, whereas the metal formed by the WAAM technique tends to exhibit a dendritic structure. Porosity, typically associated with the non-melting of individual powder particles, is observed during the manufacture of samples via the SLM method. To mitigate porosity in the products, stricter control over the raw materials used for surfacing is necessary. While the use of the WAAM method did not noticeably increase metal porosity, a new structural defect emerged in products manufactured by both methods – the formation of interface boundaries between layers, inherent to additive manufacturing technology itself. In SLM-produced products, porosity is evident at these interface boundaries, resulting in elevated internal stresses within the product. Moreover, in the SLM method, the accumulation of defects and intermetallides at the boundaries of surfacing rollers can effectively impede dislocation motion, thereby contributing to improved strength properties.
References
1. Grigoriyants A.G., Kolchanov D.S., Drenin A.A., Denezhkin A.O. Study of the influence of main parameters of the selective laser melting process on the porosity of aluminum alloy RS-300 samples. BMSTU. Journal of Mechanical Engineering. 2022;(8(749)):55–64. (In Russ.). https://doi.org/10.18698/0536-1044-2022-8-55-64
2. Grigoriyants A.G., Lutchenko A.V. Modern problems of technological development of additive techniques in mechanical engineering. Science Intensive Technologies in Mechanical Engineering. 2022;(8(134)):27–30. (In Russ.). https://doi.org/10.30987/2223-4608-2022-8-27-30
3. Turichin G.A., Zemlyakov E.V., Klimova O.G., Babkin K.D., Shamrai F.A., Kolodyazhnyi D.Yu. Direct laser manufacturing – a promising additive technology for aircraft engine production. Svarka i Diagnostika. 2015;(3):54–57. (In Russ.).
4. Panchenko O., Kurushkin D., Mushnikov D., Khismatullin I., Popovich A.A High-performance WAAM process for Al-Mg-Mn using controlled short-circuiting metal transfer at increased wire feed rate and increased travel speed. Materials and Design. 2020;195:35–45. https://doi.org/10.1016/j.matdes.2020.109040
5. Cunningham C.R., Wikshåland S., Xu F. Cost modelling and sensitivity analysis of wire and arc additive manufacturing. Procedia Manufacturing. 2017;11:650–657. https://doi.org/10.1016/j.promfg.2017.07.163
6. Kabaldin Y., Shatagin D., Ryabov D., Solovyov A., Kurkin A. Microstructure, phase composition, and mechanical properties of a layered bimetallic composite ER70S 6-ER309LSI obtained by the WAAM method. Metals. 2023;(13(5)):851. https://doi.org/10.3390/met13050851
7. Gulyaev A.P. Metal Science. Moscow: Metallurgiya; 1986: 544. (In Russ.).
8. Gonchar A.V., Klyushnikov A.A., Mishakin V.V. The effect of plastic deformation and subsequent heat treatment on the acoustic and magnetic properties of 12Khl8N10T steel. Industrial laboratory. Diagnostics of materials. 2019;85(2):23–28. (In Russ.). https://doi.org/10.26896/1028-6861-2019-85-2-23-28
9. Fetisov G.P., Karpman M.G., etc. Material Science and Technology of Metals. Moscow: Vysshaya shkola; 2002:638. (In Russ.).
10. Chernigin M.A., Sorokina S.A., Vorobyev R.A. Study of the microstructure of metastable austenitic chromium manganese steel 14Kh15G9ND by optical and electron microscopy. Industrial laboratory. Diagnostics of materials. 2023;89(4):38–44. (In Russ.). https://doi.org/10.26896/1028-6861-2023-89-4-38-44
11. Anosov M.S., Shatagin D.A., Chernigin M.A., Mordovina Yu.S., Anosova E.S. Structure formation of Np-30KhGSA alloy in wire and arc additive manufacturing. Izvestiya. Ferrous Metallurgy. 2023;66(3):294–301. (In Russ.). https://doi.org/10.17073/0368-0797-2023-3-294-301
12. Kovalenko V.S. Metallographic Reagents: Handbook. Moscow: Metallurgiya; 1981:120. (In Russ.).
13. Beckert. M., Klemm H. Handbook of Metallographic Etching Methods. Leipzig: Veb Deutscher Verlag fur Grundstoff., 1962.
14. Panchenko E.V. Metallographic Laboratory. Moscow: Metallurgiya; 1965:441. (In Russ.).
15. Gerov M., Kolmakov A., Prosvirnin D., Kayasova A., Zhdanova N., Prutskov M. Mechanical properties and fracture of austenitic steel fabricated by selective laser melting. Russian Metallurgy (Metally). 2022;2022(10):1218–1226. https://doi.org/10.1134/S0036029522100068
16. Tascioglu E., Karabulut Y., Kaynak Y. Influence of heat treatment temperature on the microstructural, mechanical, and wear behavior of 316L stainless steel fabricated by laser powder bed additive manufacturing. International Journal of Advanced Manufacturing Technology. 2020;107(5-6): 1947–1956. https://doi.org/10.1007/s00170-020-04972-0
17. Shin W.-S., Son B., Song W., Sohn H., Jang H., Kim Y.-J., Park C. Heat treatment effect on the microstructure, mechanical properties, and wear behaviors of stainless steel 316L prepared via selective laser melting. Materials Science and Engineering. 2021;806:140805. https://doi.org/10.1016/j.msea.2021.140805
18. Jeyaprakash N., Yang C.-H., Ramkumar K. R. Correlation of microstructural evolution with mechanical and tribological behavior of SS 304 specimens developed through SLM technique. Metals and Materials International. 2021;27: 5179–5190. https://doi.org/10.1007/s12540-020-00933-0
19. Vasin O.E., etc. Atlas of Defects. Scientific and Technical Collector. Yekaterinburg: Izdatel’skie resheniya; 2008:56. (In Russ.).
20. Jing G., Wang Z. Defects, densification mechanism and mechanical properties of 300M steel deposited by high power selective laser melting. Additive Manufacturing. 2021;38:101831. https://doi.org/10.1016/j.addma.2020.101831
About the Authors
Yu. G. KabaldinRussian Federation
Yurii G. Kabaldin, Dr. Sci. (Eng.), Prof., Head of the Laboratory “Nanotechnology in Mechanical Engineering”
24 Minina Str., Nizhny Novgorod 603022, Russian Federation
M. A. Chernigin
Russian Federation
Mikhail A. Chernigin, Engineer
24 Minina Str., Nizhny Novgorod 603022, Russian Federation
Review
For citations:
Kabaldin Yu.G., Chernigin M.A. Structure and its defects in additive manufacturing of stainless steels by laser melting and electric arc surfacing. Izvestiya. Ferrous Metallurgy. 2024;67(1):65-72. https://doi.org/10.17073/0368-0797-2024-1-65-72


