Scroll to:
Errors of non-contact temperature measurement
https://doi.org/10.17073/0368-0797-2023-2-229-235
Abstract
In recent years, there is a trend of improving the performance and efficiency of all existing measuring instruments due to a leap in technology. Almost every industry uses a variety of technologies that apply temperature control. Temperature of a heated body can be estimated by measuring the parameters of its thermal radiation, which are electromagnetic waves of different lengths. Temperature measurement is necessary for comfortable automatic control and management of production processes. The use of non-contact means makes it possible to measure the temperature of, firstly, moving objects, secondly, objects in inaccessible places, thirdly, to avoid damage to the measuring instruments when controlling large temperatures. High speed, the possibility of measuring temperature without disconnecting the object from the technological process, ensuring personnel safety, temperature measurement up to 3000 °C – these are the advantages of non-contact temperature measurement method. To obtain reliable values when measuring thermophysical quantities it is necessary to know the processes occurring in interaction of the measuring device or sensor with the object of measurement. These processes affect the magnitude of the measurement error, that is, magnitude of the result deviation from the true value of the measured parameter. This paper describes the errors of non-contact temperature measurement of pyrometers, namely total radiation pyrometer, partial radiation pyrometer, spectral ratio pyrometer, as well as shows the results of comparative calculations between them. Expressions for the evaluation of methodical errors of total radiation, partial radiation and spectral ratio pyrometers are given, as well as the results of comparative calculations of errors are shown.
Keywords
For citations:
Kim A.A., Podglazova M.I., Shatokhin K.S. Errors of non-contact temperature measurement. Izvestiya. Ferrous Metallurgy. 2023;66(2):229-235. https://doi.org/10.17073/0368-0797-2023-2-229-235
Non-contact temperature measurement is preferable for assessing the temperature of small, moving, and inaccessible objects, as well as in fast processes1, that require rapid response. It is also suitable for temperatures above 1000 °C. In order to select the most appropriate non-contact temperature probe for a specific application, it is necessary to acquire a fundamental understanding of temperature measurements principles 2, 3.
A pyrometer serves as a non-contact temperature sensor that estimates the temperature of an object by detecting its naturally emitted thermal radiation [1; 2] 4. There are several types of pyrometers available, including:
– total radiation pyrometer (TRP). This pyrometer records or employs the total radiation emitted by the heated body as a feedback signal to maintain the heat source temperature [3] 5);
– partial radiation pyrometer (PRP). This pyrometer measures the energy within a specific spectral range by employing a filter;
– spectral ratio pyrometer (SRP). This pyrometer estimates the energy between two measured wavelengths, which is then converted into a temperature value [4] 6, 7.
Specifications of various pyrometers can be found in the provided table [5] 8, 9.
Characteristics of pyrometers
|
Pyrometers are calibrated using a blackbody (BB). In real-world applications, there may be differences between the actual temperature of the object and the readings obtained from the pyrometer [6; 7]. To account for this, corrections are applied to the pyrometer readings [8]. The total radiation pyrometer measures the radiation temperature TR of the real body, which refers to the temperature of the blackbody at which it emits the same amount of energy across the entire wavelength range as the real body at its actual temperature TA . The partial radiation pyrometer measures the brightness temperature TB of the real body, indicating the temperature of the blackbody at which it emits the same amount of energy at a specific wavelength (or within a narrow wavelength range) as the real body at TA . The spectral ratio pyrometer measures the color temperature TC of the real body, representing the temperature of the blackbody at which the ratio of its spectral flux densities at wavelengths λ1 and λ2 is equivalent to that of the real body at TA . The relationship between TR and TA is described by Stephan-Boltzmann’s law, while the relationships between TB and TA , as well as TB , and TA , are established by Planck’s law [9; 10].
The systematic error of pyrometer temperature measurement is influenced by the blackness ε of the object. The blackness is determined by the chemical composition of the radiation source, its temperature, and the condition of its surface. The blackness value of a metal surface is affected by its oxidation level, with oxidized surface exhibiting higher blackness values compared to non-oxidized surfaces. Additionally, rough surfaces have higher ε value compared to smooth surfaces. It is important to note that the measurement of blackness is subject to some degree of error [11] 10, 11, 12.
The error associated with pyrometer measurements due to blackness can be estimated based on the following references [12 – 14]:
| \[\Delta {T_{{{\rm{R}}_{\Delta \varepsilon }}}} = - \frac{1}{4}{T_{\rm{A}}}\frac{{\Delta \varepsilon }}{\varepsilon };\] | (1) |
| \[\Delta {T_{{{\rm{B}}_{\Delta \varepsilon }}}} = \frac{{\Delta {\varepsilon _\lambda }}}{{{\varepsilon _\lambda }}}\frac{{\lambda T_{\rm{A}}^2}}{{{c_2}}};\] | (2) |
| \[\Delta {T_{{{\rm{C}}_{\Delta \varepsilon }}}} = \left( {\frac{{\Delta {\varepsilon _{{\lambda _1}}}}}{{{\varepsilon _{{\lambda _1}}}}} - \frac{{\Delta {\varepsilon _{{\lambda _2}}}}}{{{\varepsilon _{{\lambda _2}}}}}} \right)\frac{{T_{\rm{A}}^2}}{{{c_2}}}\frac{{{\lambda _1}{\lambda _2}}}{{{\lambda _1} - {\lambda _2}}}.\] | (3) |
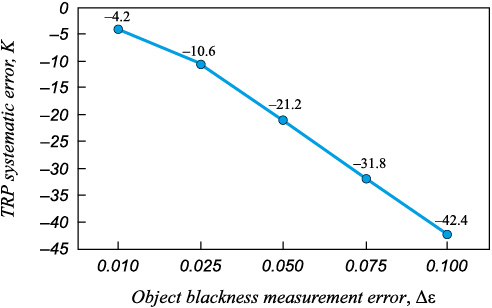
We conducted an analysis using MS Excel to examine the relationship between the measurement error of the TRP at an actual temperature of 1273 K and the blackness measurement of the object, as expressed in equation (1).
Our findings indicate that as the blackness of the object increases, the error of the radiation pyrometer decreases (Fig. 1). It should be noted that the total radiation pyrometer exhibits the lowest systematic accuracy.
Fig. 1. Dependence of methodological error of PSI measurement |
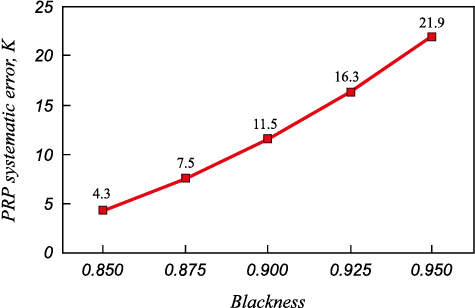
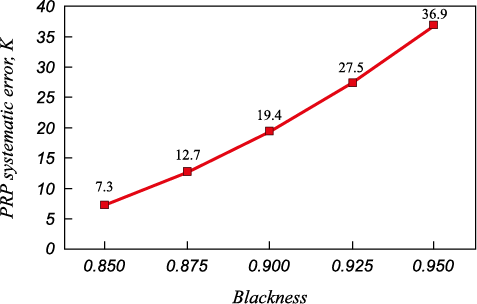
Results for equation (2) are presented in Figs. 2, 3, corresponding to effective wavelengths of 0.92 and 1.55 μm, respectevly.
Fig. 2. Methodological error of PCI as a function
Fig. 3. Methodological error of PCI as a function |
These figures illustrate that the error of the PRP decreases as the blackness of the object increases. Additionally, when measuring the same object, an PRP operating at a shorter wavelength demonstrates a smaller error compared to an instrument operating at a longer wavelength.
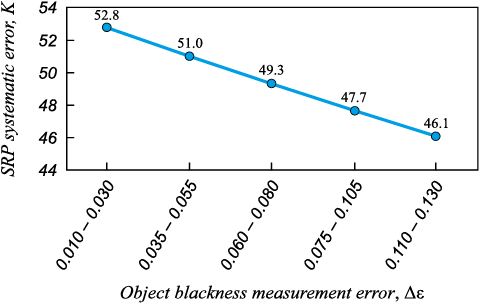
Let us analyze equation (3) at a temperature of 1000 K and spectral blackness values of 0.36 and 0.39 for the λ1 and λ2 wavelengths, respectively. Fig. 4 represent the relationship, which indicates that higher blackness results lower error for the SRP. It is important to note that even a small error in spectral blackness measurement can lead to significant measurement errors.
Fig. 4. Dependence of methodological error of SOA measurement |
Let us analyze equation (3) at a temperature of 1000 K and spectral blackness values of 0.36 and 0.39 for the λ1 and λ2 wavelengths, respectively. Fig. 4 represent the relationship, which indicates that higher blackness results lower error for the SRP. It is important to note that even a small error in spectral blackness measurement can lead to significant measurement errors.
In certain cases, substantial systematic errors can arise due to the background heat radiation of the lining. This may occur in strand-type and continuous furnaces when the lining temperature is significantly higher than the metal temperature, causing the pyrometer to receive reflected heat radiation that is more intense than the radiation emitted by the metal.
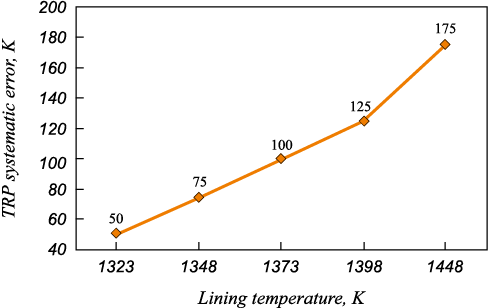
Let us denote the metal temperature as Tm , its blackness as ε, and the lining temperature as Tln . We will consider the equation for the radiation temperature in the presence of background radiation
| \[\Delta {T_{\rm{R}}} = {T_{\rm{m}}}\sqrt[4]{{\varepsilon + (1 - \varepsilon )\frac{{T_{{\rm{ln}}}^4}}{{T_{\rm{m}}^4}}}}.\] | (4) |
The results of estimations using the equation mentioned are presented in Fig. 5. It illustrates that as the lining temperature increases, the systematic error of the TRP also increases.
Fig. 5. Dependence of methodological error of PSI measurement |
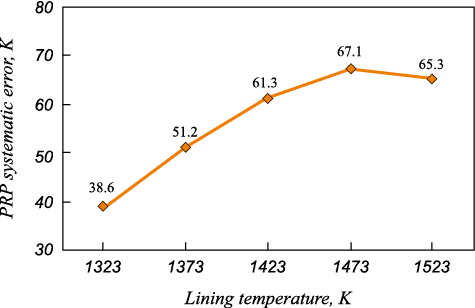
The relationship between the PRP systematic error and background radiation can be estimated according to references as [15; 16]
| \[\frac{1}{{{T_{\rm{C}}}}} = \frac{1}{{{T_{\rm{m}}}}} - \frac{\lambda }{{{c_2}}}\ln \left\{ {{\varepsilon _\lambda } + (1 - {\varepsilon _\lambda })\exp \left[ { - \frac{{{c_2}}}{\lambda }\left( {\frac{1}{{{T_{{\rm{ln}}}}}} - \frac{1}{{{T_{\rm{m}}}}}} \right)} \right]} \right\}.\] | (5) |
The results obtained at the 0.92 µm effective wavelength are depicted in Fig. 6. It is evident that the systematic error of the PRP also increases with the lining temperature.
Fig. 6. Methodological error of PCI as a function |
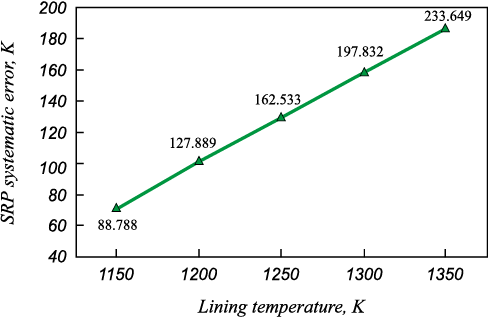
SRP systematic error, K as a function of the background radiation is estimated as
| \[\frac{1}{{{T_{\rm{C}}}}} = \frac{1}{{{T_{\rm{m}}}}} + \frac{{2{\lambda _1}}}{{({\lambda _1} - {\lambda _2}){c_2}}}\ln \left\{ {\frac{{{\varepsilon _{{\lambda _1}}} + (1 - {\varepsilon _{{\lambda _1}}})\exp \left[ { - \frac{{{c_2}}}{{{\lambda _1}}}\left( {\frac{1}{{{T_{{\rm{ln}}}}}} - \frac{1}{{{T_{\rm{m}}}}}} \right)} \right]}}{{{\varepsilon _{{\lambda _2}}} + (1 - {\varepsilon _{{\lambda _2}}})\exp \left[ { - \frac{{{c_2}}}{{{\lambda _2}}}\left( {\frac{1}{{{T_{{\rm{ln}}}}}} - \frac{1}{{{T_{\rm{m}}}}}} \right)} \right]}}} \right\}.\] | (6) |
Fig. 7 illustrates this relationship at effective wavelengths of 0.65 and 0.45 μm, with Tm = 1000 K. It is evident that the systematic error becomes substantial at elevated lining temperatures.
Fig. 7. Dependence of methodological error of SOA measurement |
This analysis aids in selecting the appropriate pyrometer type and determining the suitable spectral range for PRP and SRP measurements. By estimating the error for each pyrometer type, informed decisions can be made regarding the implementation of measures to mitigate background radiation, such as shielding or blackening of the measured object, among others.
One approach to mitigate background radiation from the lining and ambient medium is to install a water-cooled lance in the line of sight of the pyrometer, positioned over the metal. This lance supplies a transparent gas, such as air or nitrogen, which helps to reduce the background radiation. However, it should be noted that such lances come with high operating costs and can significantly cool down the heat zone. As a result, this method is not commonly employed.
When the systematic error of non-contact temperature measurement is known, appropriate corrections can still be applied to obtain the actual temperature of the object, even if it is not possible to reduce the error itself.
Conclusions
Through the utilization of Planck’s and Stephan-Boltzmann’s laws, we have established the relationship between the actual temperature of the object and the readings obtained from the pyrometer, allowing us to assess the instrument’s error.
The analysis demonstrates that the discrepancy between the actual temperature and the pyrometer readings increases with temperature. Particularly, for objects with low blackness values, this discrepancy can reach several tens of degrees, significantly affecting the accuracy of temperature measurements.
When selecting a specific pyrometer, it is crucial to consider its unique properties and the surrounding environmental conditions in order to minimize measurement errors.
Even in situations where it is not possible to completely eliminate or reduce systematic errors, knowing the error allows for appropriate corrections to be made, leading to more accurate temperature readings.
References
1. Usupova S. Goals and objectives of production process automation. The concept of automatic control, regulation and management. Pandia.ru, Online edition. Available at URL: https://pandia.ru/text/80/623/36735-9 (Accessed 01.03.2023). (In Russ.).
2. Divin A.G., Ponomarev S.V. Quality Control. Tambov: TSTU; 2013:116. (In Russ.).
3. Sheindlin A.E. Radiative Properties of Solid Materials. Moscow: Energiya; 1974:471. (In Russ.).
4. Chrzanowski K. Non-Contact Thermometry. Measurement Errors. Warsaw: SPIE Polish Chapter; 2001.
5. Garelina S.A., Latyshenko K.P., Frunze A.V. Comparative analysis of energy pyrometers and spectral ratio pyrometers. Cyberleninka, Scientific Electronic Library. Available at URL: https://cyberleninka.ru/article/n/sravnitelnyy-analiz-energeticheskih-pirometrov-i-pirometrov-spektralnogo-otnosheniya/viewer (Accessed 01.03.2023). (In Russ.).
6. Prokhorov A.M. Physics. Large Encyclopedic Dictionary. Moscow: Bol’shaya Rossiiskaya entsiklopediya; 1998:538. (In Russ.).
7. Battuello M., Ricolfi T. The effect of temperature gradients in blackbody cavities to be used for comparing radiation pyrometers. Measurement. 1987;5(4):189–191. https://doi.org/10.1016/0263-2241(87)90041-8
8. Belen’kii A.M., Bursin A.N., Kurnosov V.V., Chibizova S.I.,
9. Shatokhin K.S. Metrology and Thermal Measurements. Moscow: ID MISiS, 2019:396. (In Russ.).
10. Soev S.S. Planck’s formula. Reference Book Author 24. Available at URL: https://spravochnick.ru/fizika/termodinamika/formula_planka/ (Accessed 01.03.2023). (In Russ.).
11. Sreeja Loho Choudhury, Paul R.K. A new approach to the generalization of Planck’s law of black-body radiation. Annals of Physics. 2018;395:317–325. https://doi.org/10.1016/j.aop.2018.06.004
12. Kostkowski H.J., Lee R.D. Theory and methods of optical pyrometry. National Bureau of Standards Monograph; 1962.
13. Belen’kii A.M. Temperature Measurement: Theory, Practice, Experiment: Reference Edition in 3 Vols. Vol. 2. Temperature Measurement in Industry and Energy. Moscow: Teplotekhnik; 2007:736. (In Russ.).
14. Frunze A.V. Influence of methodological errors of pyrometer on choice of device. Fotonika. 2012;(4):46–51. (In Russ.).
15. Dong Lia, Chi Feng, Shan Gao, Ketui Daniel, Liwei Chen. Effect of pyrometer type and wavelength selection on temperature measurement errors for turbine blades. Infrared Physics & Technology. 2018;94:255–262. https://doi.org/10.1016/j.infrared.2018.09.004
16. Berdyshev V.F., Naidenov R.E., Shatokhin K.S., Gerasimenko S.A. Methods of Thermal Engineering Research. Moscow: MISIS; 2001:106. (In Russ.).
17. Belen’kii A.M., Berdyshev V.F, Gerasimenko S.A., Naidenov R.E., Semyannikov S.V., Shatokhin K.S. Metrology, Standardization and Technical Measurements: Laboratory Course. Moscow: MISiS; 2001:89. (In Russ.).
About the Authors
A. A. KimRussian Federation
Aleksandra A. Kim, Postgraduate of the Chair “Energy-Efficient and Resource-Saving Industrial Technologies”
4 Leninskii Ave., Moscow 119049, Russian Federation
M. I. Podglazova
Russian Federation
Margarita I. Podglazova, Master Student of the Chair “Energy-Efficient and Resource-Saving Industrial Technologies”
4 Leninskii Ave., Moscow 119049, Russian Federation
K. S. Shatokhin
Russian Federation
Konstantin S. Shatokhin, Cand. Sci. (Eng.), Assist. Prof. of the Chair “Energy-Efficient and Resource-Saving Industrial Technologies”
4 Leninskii Ave., Moscow 119049, Russian Federation
Review
For citations:
Kim A.A., Podglazova M.I., Shatokhin K.S. Errors of non-contact temperature measurement. Izvestiya. Ferrous Metallurgy. 2023;66(2):229-235. https://doi.org/10.17073/0368-0797-2023-2-229-235


