Scroll to:
Analysis of processing 40Kh13 martensitic stainless steel billet obtained by wire electron beam additive manufacturing
https://doi.org/10.17073/0368-0797-2025-6-626-635
Abstract
The authors investigated the microstructure and mechanical properties of the samples obtained by the method of wire electron beam additive manufacturing (WEBAM), and their machinability by milling forces using the Taguchi method. Grains of previous austenite and annealed martensite were observed in the samples in various directions. The grains of the previous austenite grow along the surfacing direction and exhibit a pronounced orientation. On the lateral surface of the sample, the grains of the previous austenite are columnar, their hardness is approximately 505 HV0.1 . On the upper surface of the sample, the grains of the previous austenite are isometric, their hardness is approximately 539 HV0.1 . The degree of transformation into martensite varies in different parts of the sample. In the part close to the lateral surface, martensite is shallower and the previous austenitic grain boundaries are not observed. Its hardness is approximately 514 HV0.1 . In the lower part of the sample, due to multiple thermal cycles, martensite decomposes, while its hardness is low and is approximately 480 HV0.1 . In the upper part of the sample, martensite and the previous austenitic grain boundaries are observed, the hardness is approximately 513 HVelectron beam additive manufacturing, microstructure, hardness, machinability, martensitic stainless steel, Taguchi method. Due to the high hardness of the sample during climb milling, a stronger impact of the cutting edge on the sample leads to an increase in cutting force. Due to the low plasticity of the sample during conventional milling, a decrease in the volume of material pressed into the back surface of the tool leads to a decrease in cutting force. As the feed rate to the tooth increases, deformation of the material increases, the temperature increases, which leads to a decrease in the material strength. Reducing the material strength slows down the growth of cutting force.
Keywords
For citations:
Zhang C., Kozlov V.N., Chinakhov D.A., Klimenov V.A., Chernukhin R.V. Analysis of processing 40Kh13 martensitic stainless steel billet obtained by wire electron beam additive manufacturing. Izvestiya. Ferrous Metallurgy. 2025;68(6):626-635. https://doi.org/10.17073/0368-0797-2025-6-626-635
Introduction
In recent years, wire electron beam additive manufacturing (Wire Electron Beam Additive Manufacturing – WEBAM) has attracted growing interest because it combines a high deposition rate (up to 2500 cm3/h) with the ability to produce parts that show high strength and fatigue resistance [1 – 6]. The process is also flexible from a manufacturing standpoint: it can operate with wire diameters down to 0.5 mm and can be used to obtain materials with a prescribed phase content, for example in nickel–aluminum alloy systems [7].
However, in contrast to conventional casting and forging, thermal processes in additive manufacturing are more complex, resulting in uncertainty in the mechanical properties of printed parts. For example, studies on 10Kh12N10T stainless steel reported that increased strength is associated with a high density of dislocations and intermetallic compounds concentrated at interlayer boundaries [8]. A study of heat dissipation conditions during the deposition of 308LSi steel showed that the use of copper as a cooling medium results in hardness values approximately 5 % higher than those obtained with air, while the hardness of the upper part of the sample is about 8 % higher than that of the lower part [9]. When thin-walled parts are produced, a columnar crystalline structure tends to develop, which leads to pronounced anisotropy; the strength difference between longitudinal and transverse directions can reach 70 MPa [10]. Due to the high heat input, WEBAM-produced parts exhibit inferior as-built surface quality, which adversely affects subsequent conventional machining operations such as milling and turning [11; 12]. 40Kh13 martensitic stainless steel (an analogue of AISI 420) is widely used for large, complex-shaped parts because it is relatively inexpensive while offering moderate corrosion resistance and high strength. At the same time, its high hardness limits machinability and accelerates tool wear [13]. In addition, because martensitic steels are highly sensitive to temperature variations and because the thermal gradient during deposition is strongly directional, WEBAM-built samples often exhibit anisotropy in both microstructure and mechanical properties [14; 15]. As a result, machining of such martensitic steels becomes even more uncertain.
The Taguchi method applied in this study is an approach to experimental optimization that uses the signal-to-noise ratio (SNR) together with orthogonal arrays to identify an optimal combination of parameters [16 – 20].
The present work therefore focuses on the microstructure and microhardness of WEBAM-deposited 40Kh13 martensitic stainless steel in different directions and regions, and evaluates machinability using the Taguchi method.
Materials and methods
The samples were produced by wire electron beam additive manufacturing on equipment designed and manufactured at Tomsk Polytechnic University. A filler wire with a diameter of 1.2 mm made of 40Kh13 martensitic stainless steel was used as the feedstock. The chemical composition of the wire was as follows (wt. %: 0.41 C, 13.2 Cr, 0.53 Si, 0.51 Ni, 0.49 Mn, 0.017 S, 0.021 P, with iron as the balance. The substrate was manufactured from the same material (40Kh13 steel). The dimensions of the samples were 70×15×14 mm (length×width×height). The printing parameters were as follows: accelerating voltage of 40 kV, beam current of 21 mA, scanning beam diameter of 3 – 5 mm, wire feed rate of 1050 mm/min, and wire feeding angle of 45°. The deposition process was carried out in a vacuum at a pressure of 5·10–3 Pa.
Microstructural analysis was performed using a BIOMED MMP-1 metallographic microscope and by scanning electron microscopy with a JEOL JSM-6000 microscope. Microhardness measurements were conducted using an EMCO-TEST DuraScan-10 hardness tester, with a load holding time of 10 s.
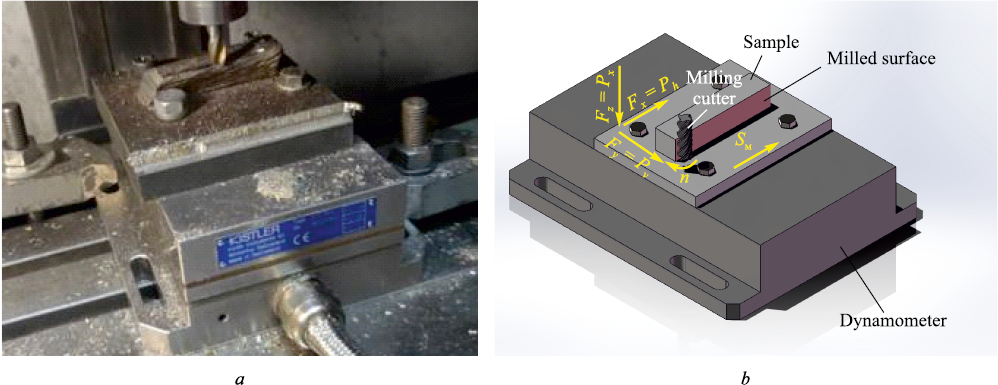
The machinability of the samples was evaluated based on milling forces. Machining experiments were carried out on a CNC EMCO CONCEPT Mill 155 machine. Cutting forces were measured using a Kistler 9257 V dynamometer (Switzerland). In the dynamometer software (originally intended for turning-force measurements), the force components are displayed as Fx , Fy and Fz . In the present milling tests, these components were interpreted as the milling-force components Ph , Pv and Px , respectively (Fig. 1). For machining, an end milling cutter with a diameter of 8 mm and four teeth, manufactured by GESAC, was used. The helix angle (ω) of the milling cutter was 35°, while the rake angle (γ) and clearance angle (α) were 7° and 5°, respectively. The base material of the milling cutter was VK8 cemented carbide (92 % tungsten carbide and 8 % cobalt as a binder). The surface of the milling cutter was coated with a wear-resistant AlCrSiN coating.
Fig. 1. Appearance (a) and model (b) of the dynamometer, milling cutter and sample installation |
The experimental levels of the factors are presented in Table 1.
Table 1. Experimental levels of the factors
| |||||||||||||||||||
To determine the minimum milling force, the signal-to-noise ratio S/N(η) was used:
| \[S{\rm{/}}N(\eta ) = - 10\lg \left( {\frac{1}{j}\sum\limits_{i = 1}^j {P_i^2} } \right),\] | (1) |
where Pi is the force value measured during the i-th milling pass.
The mean milling force Pavg was calculated using the following expression:
| \[{P_{{\rm{avg}}}} = \frac{1}{x}\sum\limits_{i = 1}^x {{P_i}} ,\] | (2) |
where x is the number of experimental repetitions.
Results and discussion
Analysis of the microstructure and mechanical
properties of the sample in different directions
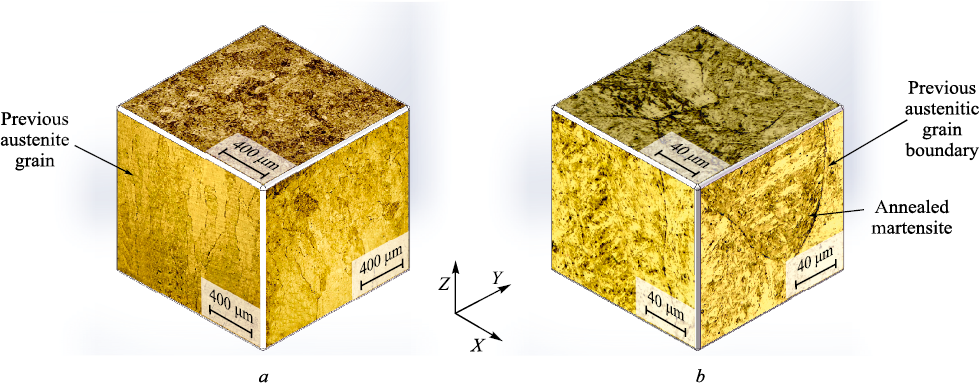
As shown in Fig. 2, the OZ axis corresponds to the deposition build direction, the OY axis is oriented along the weld bead, and the OX axis represents the transverse direction relative to the weld bead.
Fig. 2. Microstructure of the samples deposited by WEBAM in different planes |
At low magnification, the XOZ and YOZ planes reveal austenite grains prior to the martensitic transformation (previous austenite grains), which exhibit a columnar morphology with their long axes aligned along the OZ direction. This behavior is associated with the thermal conditions during deposition: the lower layers experience multiple thermal cycles and accumulate heat, resulting in the formation of a dominant heat flow opposite to the deposition direction (i.e., opposite to the OZ axis). As a consequence, a pronounced preferential growth orientation of the previous austenite grains develops along the OZ axis. In contrast, grains observed on the XOY plane display an equiaxed morphology. This can be attributed to the high deposition rate combined with relatively low heat input, which suppresses grain growth along the OY direction and equalizes heat dissipation conditions along the OX and OY directions. This promotes equal grain growth rates along the OX and OY directions, resulting in the formation of equiaxed grains. In addition, while the degree of corrosion within individual previous austenite grains is nearly uniform, noticeable differences are observed between different grains. This behavior may be related to variations in the extent and morphology of martensitic transformations caused by elemental segregation under the high cooling rates characteristic of the deposition process [15].
Fig. 2, b clearly shows that a large number of needle-like or plate-like martensitic structures formed within the previous austenite grains as a result of a diffusionless phase transformation.
The martensite within these grains is distributed in the form of an interwoven network. The orientation of martensite varies significantly from one austenite grain to another. Furthermore, a pronounced transgranular phenomenon is observed at the boundaries of previous austenite grains, which may be associated with local stress concentrations or energy gradients. In the YOZ and XOZ planes, the sizes of the previous austenite grains are nearly identical, further confirming the similarity of temperature gradients along the OX and OY directions. In contrast, the smaller size of previous austenite grains in the XOY plane leads to a denser martensitic network with a shorter average length of martensitic features. This difference can be explained by faster cooling along the OX and OY directions or by the formation of more pronounced compositional gradients in this plane due to elemental segregation, which suppresses grain coarsening [21]. As a result, the frequency of transgranular phenomena at grain boundaries in the XOY plane is also reduced.
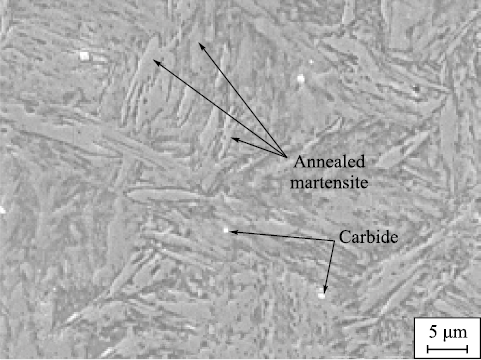
Fig. 3. Microstructure of the sample deposited by WEBAM |
A scanning electron microscopy image of the sample microstructure in the XOZ plane is presented in Fig. 3. Plate-like martensite and carbides are clearly visible. The measured hardness of the sample in the XOZ plane is 504.67 HV0.1 , which is significantly lower than that of quenched martensite (750 HV) [21]. However, the thickness of the plate-like martensitic layer is relatively small, amounting to 1.23 ± 0.56 μm. This reduction in hardness can be explained by the fact that the sample underwent several thermal cycles, during which martensite experienced thermal activation and partial decomposition, leading to an increased fraction of retained austenite. During the deposition of the first layer, the austenitic phase rapidly transforms into quenched martensite owing to the high cooling rate, resulting in the maximum martensite content. However, when the second or third layer is deposited, the first layer remains within the heat-affected zone. This promotes carbon diffusion at martensite – martensite or martensite – retained austenite interfaces, causing partial reversion of martensite to austenite. At the same time, chromium atoms impede carbon diffusion, thereby limiting martensite decomposition and restricting it to a partial transformation. Consequently, despite repeated thermal cycles, the hardness of the material remains significantly higher than that of austenitic steel [8].
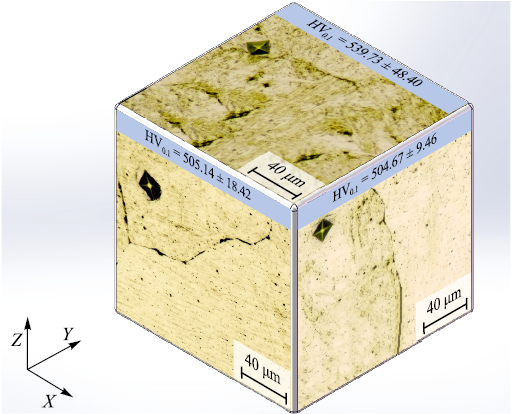
Fig. 4. Microhardness of the sample deposited by WEBAM |
The hardness of the sample in different directions is shown in Fig. 4. As noted above, the higher cooling rates along the OX and OY directions result in smaller previous austenite grain sizes in the XOY plane and a higher degree of martensitic transformation. This promotes the formation of a more continuous and homogeneous martensitic network in the XOY plane, which effectively impedes dislocation motion and increases the hardness to 539.73 HV0.1 . In contrast, the cooling rate along the OZ direction is lower, while temperature gradients along the OX and OY directions are similar. This leads to a lower degree of martensitic transformation in the XOZ and YOZ planes, facilitating dislocation motion and multiplication and promoting plastic deformation. As a result, the hardness values on these two planes are nearly identical, amounting to 505.14 and 504.67 HV0.1 , respectively.
Analysis of the microstructure in different parts of the sample
Microstructural images obtained from different regions of the sample are shown in Fig. 5. In the region close to the lateral surface of the sample (Fig. 5, a), the previous austenitic grain boundaries are indistinct. The precipitated carbide inclusions are small, and the clusters of annealed martensite are fine and uniformly distributed. This behavior is attributed to more favorable heat dissipation conditions near the lateral surface, where the cooling rate is higher. The increased cooling rate promotes the formation of a large number of fine martensitic features. At the same time, rapid cooling enhances the manifestation of a transgranular phenomenon during the martensitic transformation, as a result of which the previous austenitic grain boundaries become blurred. In the lower part of the sample (Fig. 5, b), the previous austenitic grain boundaries are clearly visible, together with large carbide precipitates and a relatively small amount of martensite. This is explained by the lower cooling rate in the lower region compared with the area close to the lateral surface, which leads to a less pronounced transgranular phenomenon and, consequently, to clearly defined previous austenitic grain boundaries. In addition, because the lower part of the sample experienced a relatively larger number of thermal cycles during deposition, the amount of precipitated carbides and decomposed martensite increased. In the upper part of the sample (Fig. 5, c), the microstructure differs from both the lower region and the area close to the lateral surface. The previous austenitic grain boundaries and martensite are clearly visible, and the thickness of the martensitic layer is greater. This is associated with the smaller number of thermal cycles experienced by the upper part of the sample, which results in only limited martensite decomposition and allows its structure to remain well defined. At the same time, compared with the region near the lateral surface, the cooling rate in the upper part was lower, leading to the formation of a thicker martensitic layer.
Fig. 5. Microstructure of the sample deposited by WEBAM in YOZ plane in the part |
Indentations obtained during microhardness measurements in different regions of the sample are shown in Fig. 6. The microhardness is lowest in the lower part of the sample due to martensite decomposition. In the region close to the lateral surface, the microhardness is slightly higher than that measured in the upper part of the sample; however, both values exceed the microhardness measured in the central region of the YOZ plane shown in Fig. 4. This can be explained by the higher martensite content in the upper part of the sample and by the smaller size of martensitic regions near the lateral surface, both of which contribute to increased hardness. In addition, owing to the smaller size of the previous austenitic grains, the microhardness on the XOY plane is higher than that on the YOZ plane in the different parts of the sample.
Fig. 6. Microhardness of the sample deposited by WEBAM in YOZ plane in the part close |
Analysis of machinability based on milling forces
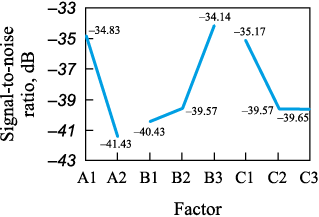
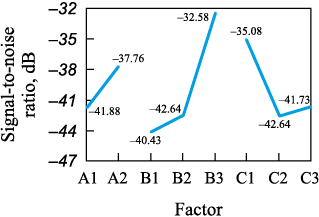
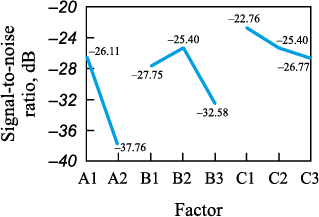
Using the Taguchi method, the present study investigated the machinability of a 40Kh13 martensitic stainless steel sample produced by the WEBAM process during milling along the OX direction on the XOZ surface. Based on calculations using Eqs. (1) and (2), the mean values of the experimental results and the corresponding signal-to-noise ratios are presented in Table 2.
Table 2. Mean values of experimental results and signal-to-noise ratio
| ||||||||||||||||||||||||||||||||||||||||||||||||||||||||||||||||||||||||
The expression used to calculate the mean signal-to-noise ratio is given by:
| \[S{\rm{/}}{N_{{\rm{avg}}}} = \frac{1}{m}\sum\limits_{i = 1}^m {S{\rm{/}}{N_j}} ,\] | (3) |
where m is the number of parameter combinations at the same level of the given factor.
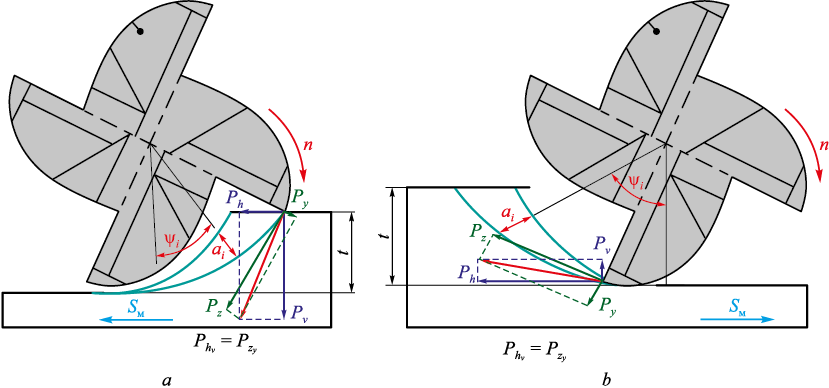
As follows from Tables 2 and 3, during climb milling the milling force Ph , acting along the feed direction, is lower than that obtained during conventional milling, whereas the force Pv , acting perpendicular to the feed direction, is higher than in conventional milling (Fig. 7). These differences arise because, when machining with a new milling cutter, the dominant tangential force Pz (acting along the cutting speed v) during conventional milling is oriented almost along the feed direction, while during climb milling it is oriented nearly perpendicular to the feed direction [14]. In addition, owing to the high hardness of martensitic stainless steel, the impact force acting on the cutting edge during climb milling is higher, whereas during conventional milling the low plasticity of the material reduces the volume of material pressed into the flank surface of the milling cutter, which leads to a decrease in the milling force.
Table 3. Results of analysis of the factors effects on signal-to-noise ratio
Fig. 7. Direction of forces Ph , Pv , Pz and Py during climb milling (a) and conventional milling (b) | |||||||||||||||||||||||||||||||||||||||||||||||||||||||||||||||
As the feed rate sm increases, the chip thickness ai and material deformation increase, and the cutting temperature also rises. This results in an increase in the milling forces Ph and Pv , however, the rate of their growth decreases. Moreover, an increase in cutting temperature may lead to martensite decomposition, which further reduces the material strength and additionally slows the growth of Ph and Pv . When the rotational speed n decreases, the feed per tooth sz , increases, and consequently the chip thickness a and material deformation increase; therefore, the milling forces Ph and Pv increase. According to the data in Table 2, the axial force Px shows little sensitivity to the feed rate sm and the rotational speed n, because is only weakly affected by chip thickness. However, due to temperature variations, the axial force Px may change slightly.
Conclusions
In the present study, the microstructure and mechanical properties of the sample were investigated in different directions. On the lateral surface of the sample, columnar grains of previous austenite were observed, with a hardness of approximately 505 HV0.1 , whereas the upper surface exhibited equiaxed grains with a higher hardness of 539.73 HV0.1 . Overall, the microstructure of the sample corresponds predominantly to annealed martensite, within which a pronounced transgranular phenomenon can be observed. This microstructural state is associated with the multiple thermal cycles experienced during deposition.
The microstructure and mechanical properties were also examined in different regions of the sample. In the region close to the lateral surface, the higher cooling rate results in finer martensitic features and increased hardness, reaching 514.2 ± 5.85 HV0.1 . In both the lower and upper regions of the sample, the previous austenitic grain boundaries are clearly visible. Because the lower part of the sample experienced a greater number of thermal cycles, martensite decomposition occurred, leading to a reduction in hardness to 480.49 ± 8.19 HV0.1 . In contrast, the upper part of the sample was subjected to fewer thermal cycles and retained a substantial amount of martensite; as a result, the hardness remained relatively high at 512.80 ± 5.25 HV0.1 .
The machinability of the sample was evaluated using the Taguchi method. Owing to the high hardness of the material, the impact of the cutting edge on the machined surface during climb milling leads to an increase in milling forces. Conversely, during conventional milling, the low plasticity of the material reduces the volume of material pressed into the flank surface of the milling cutter, resulting in lower milling forces. Furthermore, as the feed per tooth increases, the rise in cutting temperature reduces the material strength, which slows the growth of milling forces.
References
1. Frazier W.E. Metal additive manufacturing: A review. Journal of Materials Engineering and Performance. 2014;23(6): 1917–1928. https://doi.org/10.1007/s11665-014-0958-z
2. Klimenov V., Kolubaev E., Klopotov A., Chumaevskii A., Ustinov A., Strelkova I., Rubtsov V., Gurianov D., Han Z., Nikonov S., Batranin A., Khimich M. Influence of the coarse grain structure of a titanium alloy Ti-4Al-3V formed by wire-feed electron beam additive manufacturing on strain inhomogeneities and fracture. Materials. 2023;16(11):3901. https://doi.org/10.3390/ma16113901
3. Osipovich K., Kalashnikov K., Chumaevskii A., Gurianov D., Kalashnikova T., Vorontsov A., Zykova A., Utyaganova V., Panfilov A., Nikolaeva A., Dobrovolskii A., Rubtsov V., Kolubaev E. Wire-feed electron beam additive manufacturing: A review. Metals. 2023;13(2):279. https://doi.org/10.3390/met13020279
4. Negi S., Nambolan A.A., Kapil S., Joshi P.S., Manivannan E.R., Karunakaran K.P., Bhargava P. Review on electron beam based additive manufacturing. Rapid Prototyping Journal. 2020;26(3):485-498. https://doi.org/10.1108/RPJ-07-2019-0182
5. Kinsella M.E., Count P. Additive Manufacturing of Superalloys for Aerospace Applications (Preprint). AFRL-RX-WP-TP-2008-4318, 2008.
6. Mudge R.P., Wald N.R. Laser engineered net shaping advances additive manufacturing and repair. Welding Journal. 2007;86(1):44–48.
7. Astafurov S.V., Mel’nikov E.V., Astafurova E.G., Kolubaev E.A. Phase composition and microstructure of intermetallic alloys obtained using electron-beam additive manufacturing. Izvestiya. Ferrous Metallurgy. 2024;67(4):401–408. https://doi.org/10.17073/0368-0797-2024-4-401-408
8. Kabaldin Yu.G., Chernigin M.A. Structure and its defects in additive manufacturing of stainless steels by laser melting and electric arc surfacing. Izvestiya. Ferrous Metallurgy. 2024;67(1):65–72. https://doi.org/10.17073/0368-0797-2024-1-65-72
9. Chinakhov D.A., Akimov K.O. Formation of the structure and properties of deposited multilayer specimens from austenitic steel under various heat removal conditions. Metals. 2022;12(9):1527. https://doi.org/10.3390/met12091527
10. Astafurova E.G., Panchenko M.Yu., Moskvina V.A., Maier G.G., Astafurov S.V., Melnikov E.V., Fortuna A.S., Reunova K.A., Rubtsov V.E., Kolubaev E.A. Microstructure and grain growth inhomogeneity in austenitic steel produced by wire-feed electron beam melting: the effect of post-building solid-solution treatment. Journal of Materials Science. 2020;55(22):9211–9224. https://doi.org/10.1007/s10853-020-04424-w
11. Tyagi P., Goulet T., Riso C., Stephenson R., Chuenprateep N., Schlitzer J., Benton C., Garcia-Moreno F. Reducing the roughness of internal surface of an additive manufacturing produced 316 steel component by chempolishing and electropolishing. Additive Manufacturing. 2019;25:32–38. https://doi.org/10.1016/j.addma.2018.11.001
12. Fox J.C., Moylan S.P., Lane B.M. Effect of process parameters on the surface roughness of overhanging structures in laser powder bed fusion additive manufacturing. Procedia CIRP. 2016;45:131–134. https://doi.org/10.1016/j.procir.2016.02.347
13. Rahman A.Z., Jauhari K., Al Huda M., Untariyati N.A., Azka M., Rusnaldy R., Widodo A. Correlation analysis of vibration signal frequency with tool wear during the milling process on martensitic stainless steel material. Arabian Journal for Science and Engineering. 2024;49:10573–10586. https://doi.org/10.1007/s13369-023-08397-1
14. Martyushev N.V., Kozlov V.N., Qi M., Tynchenko V.S., Kononenko R.V., Konyukhov V.Y., Valuev D.V. Production of workpieces from martensitic stainless steel using electron-beam surfacing and investigation of cutting forces when milling workpieces. Materials. 2023;16(13):4529. https://doi.org/10.3390/ma16134529
15. Alvarez L.F., Garcia C., Lopez V. Continuous cooling transformations in martensitic stainless steels. ISIJ International. 1994;34(6):516–521. https://doi.org/10.2355/isijinternational.34.516
16. Park S.H. Robust Design and Analysis for Quality Engineering. London: Chapman and Hall; 1996:256.
17. Unal R., Dean E.B. Taguchi approach to design optimization for quality and cost: An overview. In: Proceedings of the Int. Society of Parametric Analyst 13th Annual. 1991, May 21–24. 1991:1–10.
18. Phadke M.S. Quality Engineering Using Robust Design. Englewood Cliffs, NY: Prentice-Hall; 1989:320.
19. Günay M., Yücel E. Application of Taguchi method for determining optimum surface roughness in turning of high-alloy white cast iron. Measurement. 2013;46(2):913–919. https://doi.org/10.1016/j.measurement.2012.10.013
20. Nalbant M., Gökkaya H., Sur G. Application of Taguchi method in the optimization of cutting parameters for surface roughness in turning. Materials and Design. 2007; 28(4):1379–1385. https://doi.org/10.1016/j.matdes.2006.01.008
21. Krakhmalev P., Yadroitsava I., Fredriksson G., Yadroitsev I. In situ heat treatment in selective laser melted martensitic AISI 420 stainless steels. Materials and Design. 2015;87:380–385. https://doi.org/10.1016/j.matdes.2015.08.045
About the Authors
C. ZhangRussian Federation
Cinzhun Zhang, Postgraduate of the Chair of Mechanical Engineering
30 Lenina Ave., Tomsk 634050, Russian Federation
V. N. Kozlov
Russian Federation
Viktor N. Kozlov, Cand. Sci. (Eng.), Assist. Prof. of the Department of Mechanical Engineering of the Engineering School of New Production Technologies
30 Lenina Ave., Tomsk 634050, Russian Federation
D. A. Chinakhov
Russian Federation
Dmitrii A. Chinakhov, Dr. Sci. (Eng.), Dean of the Aircraft Faculty
20 Karla Marksa Ave., Novosibirsk 630073, Russian Federation
V. A. Klimenov
Russian Federation
Vasilii A. Klimenov, Dr. Sci. (Eng.), Prof.-Consultant of the Department of Materials Science of the Engineering School of New Production Technologies
30 Lenina Ave., Tomsk 634050, Russian Federation
R. V. Chernukhin
Russian Federation
Roman V. Chernukhin, Cand. Sci. (Eng.), Assist. Prof. of the Chair of Engineering of Technological Machines
20 Karla Marksa Ave., Novosibirsk 630073, Russian Federation
Review
For citations:
Zhang C., Kozlov V.N., Chinakhov D.A., Klimenov V.A., Chernukhin R.V. Analysis of processing 40Kh13 martensitic stainless steel billet obtained by wire electron beam additive manufacturing. Izvestiya. Ferrous Metallurgy. 2025;68(6):626-635. https://doi.org/10.17073/0368-0797-2025-6-626-635


