Scroll to:
Inhomogeneity of deformation of surfaced stainless steel
https://doi.org/10.17073/0368-0797-2024-6-679-685
Abstract
The work is devoted to the study of the inhomogeneity of deformation of steel samples with laser surfacing. Highly nitrogenous austenitic stainless steel of the 08Kh18N6AG10S grade was selected as the substrate material in the state as received. To improve the mechanical properties of structural elements that operate under conditions of impact and abrasive wear, a surfacing of Ni–7Cr–6Fe + 60 % WC composite powder was applied to the steel. The surfacing was carried out with a change in the power of laser radiation from 1 to 3 kW and a change in the scanning speed from 0.005 to 0.040 m/s. The penetration depth of a single roller decreases with increasing scanning speed. The microhardness varies widely in the surfacing thickness (from 7,000 ± 80 to 13,500 ± 70 MPa) and decreases with increasing the scanning speed. Using the speckle photography method in the process of uniaxial extension of flat samples, it was found that the modes of laser surfacing also affect the level of inhomogeneity of deformation of micro-volumes of the deposited layer and the substrate. At the elastoplastic transition, the coefficient of variation of local deformations in the sample increases with an increase in the specific energy of laser surfacing. Coatings made of Ni – Cr – Fe + WC composite powder, obtained by laser surfacing under specified conditions, make it possible to increase the hardness and service life of structural elements of rotary controlled systems made of 08Kh18N6AG10S steel.
For citations:
Buyakova S.P., Kayurov K.N., Barannikova S.A. Inhomogeneity of deformation of surfaced stainless steel. Izvestiya. Ferrous Metallurgy. 2024;67(6):679-685. https://doi.org/10.17073/0368-0797-2024-6-679-685
Introduction
The increasing volume of hydrocarbon recovery requires complex well design profiles, where trajectories often include curved and inclined-rectilinear sections of significant length. For drilling such wells, rotary controlled systems (RCS) are employed as drill bit drives [1; 2]. The components of these systems are made from non-magnetic austenitic stainless steels [3; 4]. Under high loads, these elements develop defects that may lead to failures, with incidents most frequently occurring during rotary drilling operations in wells.
The hardness and wear resistance of steel surfaces can be enhanced by applying metal-ceramic (MC) coatings [5 – 7]. These coatings, a type of metal-matrix composite, consist of a metallic matrix reinforced with ceramic particles. Ceramic phases provide high hardness, while the relatively soft matrix holds the ceramic particles, imparting high fracture resistance and strength to the composite [8 – 11]. Metal-ceramic materials are highly resistant to abrasive wear.
One of the most widely used reinforcing materials for creating MC coatings is tungsten carbide (WC), known for its high hardness and strength [12 – 16]. These properties make WC-based coatings widely used for strengthening the working surfaces of wear-prone machine parts and mining tools. However, surfacing austenitic steels is challenging due to their tendency to form hot cracks during crystallization [17]. Solidification cracks in weld metal are considered the most detrimental and are more frequently observed than other types of cracking. The structure of austenitic steels is highly dependent on their chemical composition and the thermophysical conditions of crystallization, which are determined by the processing method [8; 17].
Technologies for additive manufacturing through layer-by-layer surfacing are rapidly developing [18 – 20]. These technologies enable the production of components with diverse geometric shapes, including large-scale parts, while also reducing material consumption. Such methods yield products with mechanical properties superior to those achieved through traditional manufacturing techniques. Layer-by-layer surfacing can be accomplished using various methods, with heat sources such as lasers, electron beams, electric arcs, and plasma arcs. Regardless of the method and type of material used, one of the critical features of additive manufacturing through layer-by-layer surfacing is the anisotropy of mechanical properties. This anisotropy arises from the crystallization process of the metal, leading to heterogeneous structures within the deposited layer and transcrystalline grain growth. Technologies utilizing concentrated energy sources offer significant potential for addressing these challenges.
Given that processes occurring near the interface during laser surfacing can impact the material’s mechanical properties, this study aimed to investigate the effect of laser surfacing parameters on the inhomogeneity of plastic deformation in austenitic steel with surfacing.
Materials and methods
Forgings made of non-magnetic, high-nitrogen chromium-nickel-manganese stainless steel of the 08Kh18N6AG10S grade were used as the substrate material. The chemical composition of the steel was as follows, wt. %: <0.06 C; 16.0 – 18.0 Cr; 5.0 – 6.0 Ni; >0.4 N; 8.5 – 10.0 Mn; 0.6 – 1.2 Si; balance Fe. Currently, 08Kh18N6AG10S steel has demonstrated positive application experience in geophysical instruments, showing higher ductility and impact toughness compared to imported analogs while maintaining increased strength properties [21]. The austenitic stainless steel of the 08Kh18N6AG10S grade, in the as-received state, has an average yield strength of 800 MPa, an ultimate tensile strength of 1000 MPa, and an elongation at break of up to 20 %. The microstructure and phase composition of the steel have been described in detail in [21].
Laser surfacing of the Fe – Cr – Mn – Ni – N steel plates was performed using Ni – 7Cr – 6Fe + 60 % WC powder on an experimental setup at the Institute of Strength Physics and Materials Science of the Siberian Branch of the Russian Academy of Sciences (ISPMS SB RAS). The surfacing material was a nickel-based alloy with a high content of tungsten carbide particles uniformly distributed within the solid matrix, which had a hardness exceeding 63 HRC. The particle size of tungsten carbide ranged from 10 to 45 μm, ensuring maximum resistance to abrasive and erosive wear. Surfacing parameters were selected to achieve a uniform, monolithic coating based on pre-established technological conditions. The beam diameter (d) was 4 mm, the power of the LS-15 fiber laser ranged from 1 to 3 kW, the scanning speed (V) ranged from 0.005 to 0.040 m/s, and the powder feed rate (F) was 20 mg/s.
Flat samples with dimensions of 50×8×2 mm in the working section were cut from the billets using the electro-spark method. The thickness of the Ni – 7Cr – 6Fe + 60 % WC surfacing layer was 1 mm, and the substrate layer (Fe – Cr – Mn – Ni – N) was 7 mm. The prepared samples were subjected to uniaxial tensile testing at room temperature on a Walter + Bai AG universal testing machine (LFM 125 series). The displacement rate of the movable grip Vmach was 0.4 mm/min, corresponding to a deformation rate of 1.67·10–4 s–1.
Structural studies were conducted using light microscopy (AXIOVERT-200MAT microscope) and X-ray diffraction analysis (DRON-07 diffractometer). The distribution of chemical elements across the thickness of the base and surfacing metal was measured using a LEO EVO 50 scanning electron microscope (Carl Zeiss, Germany) equipped with an Oxford Instruments attachment for X-ray dispersive microanalysis (Nanotech Center of ISPMS SB RAS). Microhardness measurements were performed using an instrumented indentation method in accordance with GOST R 8.748–2011 (ISO 14577-1:2002) on a PMT-3 microhardness tester.
Deformation fields on the surface of flat samples were recorded during mechanical testing using the speckle photography method outlined in [22 – 25]. The local elongation along the tensile axis of the sample, denoted as εxx , is typically the most intuitive parameter for visualizing and analyzing components of the plastic distortion tensor. To quantitatively evaluate the deformation inhomogeneity of the substrate and surfacing, the coefficient of variation was determined as the ratio of the standard deviation to the mean value [26].
Research results
During laser surfacing, powder granules melt, and the liquid alloy wets the tungsten carbide particles. As a result of subsequent high-speed crystallization, a metal-ceramic coating is formed. Mechanical testing revealed that surface hardening of the austenitic steel increased its tensile strength to 1500 MPa while reducing its ductility by 6 %.
To achieve metallurgical bonding between the surfacing material and the steel substrate while preventing dilution of the coating by the substrate material, surfacing must be performed under optimal conditions. Preventing crack formation requires applying different surfacing modes when depositing a single roller. The geometric parameters of the surfacing beads (coating thickness, penetration depth into the steel, and bead width) depend on the scanning speed, powder feed rate, and laser power. To optimize surfacing conditions, with constant powder feed rate and laser beam diameter, the scanning speed V and laser power P were chosen as variable factors (see Table). These parameters allow adjusting the specific energy, calculated as described in [17]:
\[E = \frac{P}{{Vd}},\]
where Е is the specific energy, P is the laser power, d is the beam diameter, and V is the scanning speed.
|
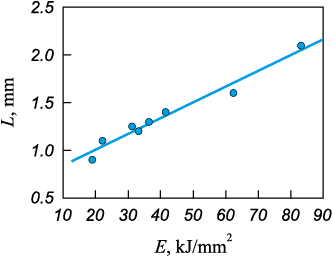
Fig. 1 illustrates the effect of specific energy (E) on the penetration depth (L) of 08Kh18N6AG10S steel. The reduction in penetration depth with increasing scanning speed is attributed to the lower energy absorption during laser surfacing. As scanning speed increases, the proportion of the surface area covered by tungsten carbide (WC) particles grows, thereby reducing the mixing zone depth between the Ni – 7Cr – 6Fe + 60 % WC powder and the steel substrate.
Fig. 1. Effect of specific energy (scanning speed and laser power) |
X-ray diffraction analysis and dispersive microanalysis revealed that the content of the main alloying elements in the base metal corresponds to the nominal composition of 08Kh18N6AG10S steel. During heating, diffusion of alloying elements occurs from the base metal into the surfacing layer, while carbon diffuses in the opposite direction. At the interface on the austenitic steel side, reduced concentrations of manganese, chromium, and nitrogen were observed, along with an increased concentration of iron. No visible inclusions of ferrite or σ-phase were detected in the base metal (08Kh18N6AG10S) or the heat-affected zone (HAZ). In the HAZ, a distinct dendrite junction line was observed. Microstructural analysis of the laser surfacing layer identified several zones: a columnar structure oriented normal to the interface with the substrate and a mixed structure comprising fine equiaxed dendrites and lamellar eutectic formations located at grain boundaries. The microstructure consists of various carbides, including undissolved (WC), partially dissolved (W2C), and precipitated carbides (Me23C6 and Me6C) within an austenitic matrix (refer to the Table, where Me = Cr, Fe, W, and Ni). The volume fraction of these precipitates varies depending on the surfacing parameters, directly influencing changes in microhardness.
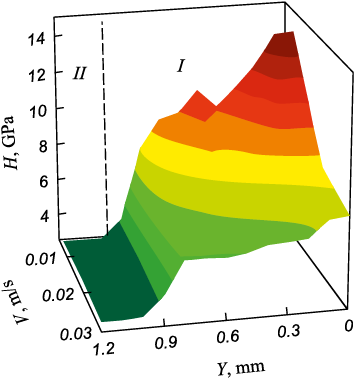
Measurements indicated that the average microhardness of the base metal is 3285 ± 80 MPa, while in the connection zone with the surfacing layer, it reaches 3995 ± 70 MPa (Fig. 2). The microhardness of the surfacing layer, composed of Ni – Cr – Fe + WC, varies from 7000 ± 80 to 13,500 ± 70 MPa, depending on the surfacing modes (Fig. 2). The maximum microhardness is achieved at a low scanning speed during laser surfacing. This can be attributed to the high mass fraction of WC particles at lower scanning speeds and the enhanced dissolution of WC within the matrix. Increasing the scanning speed reduces the volumetric fraction of carbides, thereby decreasing the microhardness of the surfacing layer. Additionally, at low scanning speeds, a gradual decrease in microhardness is observed with increasing depth from the surface. This is explained by variations in the content and morphology of WC particles. Such a graded microstructure can be beneficial for maximizing wear resistance without compromising the strength of the surfacing layer. Conversely, higher scanning speeds result in a more uniform distribution of microhardness throughout the depth. These variations in microhardness are linked to the formation of composite microstructures consisting of various carbides dispersed within the stainless steel matrix.
Fig. 2. Effect of scanning speed on microhardness distribution in the sample |
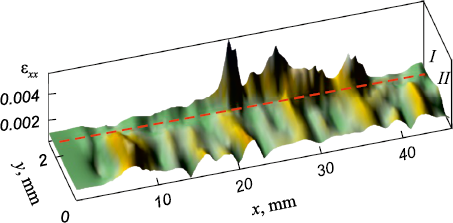
Speckle photography data on local deformations εxx revealed areas of localized deformation in both the base metal and the surfacing layers (Fig. 3).
Fig. 3. Distribution of local deformations in the sample at scanning speed of 0.020 m/s |
The analysis shows that plastic deformation is concentrated in specific zones of the sample, while other regions of the material remain nearly undeformed under the same increase in deformation. To quantitatively evaluate the degree of deformation inhomogeneity across different layers, the coefficient of variation of local deformations (ν) was used. For ν > 0.4, the distribution of local elongations along the sample length εxx(xi ) becomes significantly non-uniform, making the average value <εxx > unrepresentative [26].
The structural inhomogeneity near the interface between the surfacing layer and the substrate significantly affects the development of localized deformation. For deformation compatibility at the composite interface, the deformations in the microvolumes adjacent to the boundary must be equal. As a result, the levels of deformation inhomogeneity in the microvolumes of different layers, measured by the coefficient of variation n, should also be balanced. Achieving this balance contributes to a more complex stress state in these regions.
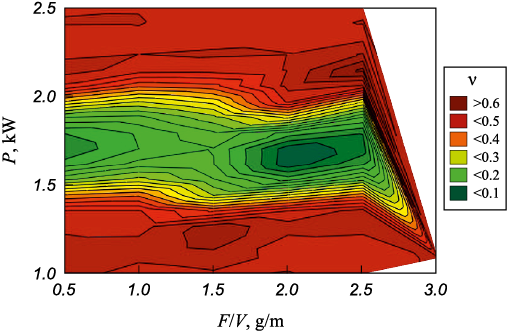
Fig. 4 illustrates the variation in the deformation inhomogeneity n in a sample with surfacing under different modes during the initial stages of deformation, at a total deformation ε = 0.01. Upon reaching the yield strength, the levels of deformation inhomogeneity in the stainless steel and the surfacing layer differ significantly, depending on the increase in total deformation and specific energy.
Fig. 4. Effect of laser surfacing modes on inhomogeneity degree |
A detailed analysis of microhardness distribution and deformation inhomogeneity in the composite revealed that laser surfacing modes with a laser power of 1.5 – 2.0 kW and scanning speeds of 0.007 – 0.040 m/s ensure satisfactory geometric parameters of the surfacing beads and the absence of cracks in the material.
Conclusions
To maintain the mechanical properties of the composite (steel – surfacing), it is crucial to select laser surfacing parameters that minimize deformation heterogeneity in the microvolumes of both the surfacing layer and the base metal.
The study demonstrated the effect of laser surfacing parameters on the distribution of microhardness and local deformations during the early stages of plastic deformation in 08Kh18N6AG10S stainless steel with a Ni – Cr – Fe + WC composite powder surfacing layer.
Coatings made from Ni – 7Cr – 6Fe + 60 % WC, composite powder, applied using laser surfacing at a power of 1.5 – 2.0 kW and scanning speeds of 0.007 – 0.040 m/s, are recommended to enhance the hardness and service life of structural elements in rotary controlled systems manufactured from 08Kh18N6AG10S steel.
References
1. Shevchenko I.A. Drilling wells with a large departure from the vertical, using a rotary-driven systems with control geophysical parameters in real-time. Sovremennaya nauka: aktual’nye problemy teorii i praktiki. Seriya: estestvennye i tekhnicheskie nauki. 2014;(1-2):36–39. (In Russ.).
2. Zakirov A.Ya. The first test results of Russian-made rotary-controlled systems. Pro neft'. Professional'no o nefti. 2016; (2(2)):43–47. (In Russ.).
3. Speidel M., Speidel H. Austenitic stainless steels of high strength and ductility. International Journal of Materials Research. 2004;95(7):596–600. http://doi.org/10.1515/ijmr-2004-0115
4. Kostina M.V., Rigina L.G. Nitrogen-containing steels and methods of their production. Izvestiya. Ferrous Metallurgy. 2020;63(8):606–622. (In Russ.). https://doi.org/10.17073/0368-0797-2020-8-606-622
5. Nurminen J., Näkki J., Vuoristo P. Microstructure and properties of hard and wear resistant MMC coatings deposited by laser cladding. The International Journal of Refractory Metals and Hard Materials. 2009;27(2):472–478. http://doi.org/10.1016/j.ijrmhm.2008.10.008
6. Zhong M., Liu W., Zhang Y., Zhu X. Formation of WC/Ni hard alloy coating by laser cladding of W/C/Ni pure element powder blend. International Journal of Refractory Metals and Hard Materials. 2006;24(6):453–460. http://doi.org/10.1016/j.ijrmhm.2005.09.002
7. Luo D., Hellman J., Luhulima D., Liimatainen J., Lindroos V.K. Interactions between tungsten carbide (WC) particulates and metal matrix in WC-reinforced composites. Materials Science and Engineering: A. 2003;340(1-2):155–162. http://doi.org/10.1016/S0921-5093(02)00173-9
8. Zhang Z., Yu T., Kovacevic R. Erosion and corrosion resistance of laser cladded AISI 420 stainless steel reinforced with VC. Applied Surface Science. 2017;410:225–240. http://doi.org/10.1016/j.apsusc.2017.03.137
9. Xiao Q., Sun W.-L., Yang K.-X., Xing X.-F., Chen Z.-H., Zhou H.-N., Lu J. Wear mechanisms and micro-evaluation on WC particles investigation of WC-Fe composite coatings fabricated by laser cladding. Surface and Coatings Technology. 2021;420:127341. http://doi.org/10.1016/j.surfcoat.2021.127341
10. Lee H.K. Effects of the cladding parameters on the deposition efficiency in pulsed Nd:YAG laser cladding. Journal of Materials Processing Technology. 2008;202(1-3):321–327. http://doi.org/10.1016/j.jmatprotec.2007.09.024
11. Hu G., Yang Y., Qi K., Lu X., Li J. Investigation of the microstructure and properties of NiCrBSi coating obtained by laser cladding with different process parameters. Transactions of the Indian Institute of Metals. 2020;73(10):2623–2634. http://doi.org/10.1007/s12666-020-02065-w
12. Huang S.W., Samandi M., Brandt M. Abrasive wear performance and microstructure of laser clad WC/Ni layers. Wear. 2004;256(11-12):1095–1105. https://doi.org/10.1016/S0043-1648(03)00526-X
13. Van Acker K., Vanhoyweghen D., Persoons R., Vangrunderbeek J. Influence of tungsten carbide particle size and distribution on the wear resistance of laser clad WC/Ni coatings. Wear. 2005;258(1-4):194–202. https://doi.org/10.1016/j.wear.2004.09.041
14. Yang J., Liu F., Miao X., Yang F. Influence of laser cladding process on the magnetic properties of WC-FeNiCr metal-matrix composite coatings. Journal of Materials Processing Technology. 2012;212(9):1862–1868. https://doi.org/10.1016/j.jmatprotec.2012.04.009
15. Si S.-H., Yuan X.-M., Liu Y.-L., He Y.-Z., Keesam Sh. Effect of laser power on microstructure and wear resistance of WCP/Ni cermet coating. Journal of Iron and Steel Research International. 2006;13:74–78. https://doi.org/10.1016/S1006-706X(06)60065-4
16. Guo Ch., Chen J., Zhou J., Zhao J., Wang L., Yu Y., Zhou H. Effects of WC–Ni content on microstructure and wear resistance of laser cladding Ni-based alloys. Surface and Coatings Technology. 2012;206(8-9):2064–2071. https://doi.org/10.1016/j.surfcoat.2011.06.005
17. Anandan S., Pityana L., Majumdar J.D. Structure-property-correlation in laser surface alloyed AISI 304 stainless steel with WC + Ni + NiCr. Materials Science and Engineering: A. 2012;536:159–169. https://doi.org/10.1016/j.msea.2011.12.095
18. Durst G. A new development in metal cladding. JOM. 1956; 8(3):328–333. https://doi.org/10.1007/BF03377692
19. Bogue R. Fifty years of the laser: its role in material processing. Assembly Automation. 2010;30(4):317–322. http://doi.org/10.1108/01445151011075771
20. Han T., Zhou K., Chen Z., Gao Y. Research progress on laser cladding alloying and composite processing of steel materials. Metals. 2022;12(12):2055. https://doi.org/10.3390/met12122055
21. Gordienko A.I., Abdulmenova E.V., Kozlova T.V., Gomorova Yu.F., Vlasov I.V., Fotin I.A., Kayurov K.N., Buyakova S.P. Effect of heat treatment modes on structure and properties of 08Kh18N6AG10S steel. Izvestiya. Ferrous Metallurgy. 2024;67(2):195–204. https://doi.org/10.17073/0368-0797-2024-2-195-204
22. Zuev L.B., Barannikova S.A., Maslova O.A. The features of localized plasticity autowaves in solids. Materials Research. 2019;22(4):104–123. http://doi.org/10.1590/1980-5373-mr-2018-0694
23. Zuev L.B., Barannikova S.A. Autowave physics of material plasticity. Crystals. 2019;9(9):458. https://doi.org/10.3390/cryst9090458
24. Zuev L.B., Khon Yu.A. Plastic flow as spatiotemporal structure formation. Part I. Qualitative and quantitative patterns. Physical Mesomechanics. 2022;25(2):103–110. https://doi.org/10.1134/S1029959922020011
25. Zuev L.B., Gorbatenko V.V., Pavlichev K.V. Elaboration of speckle photography techniques for plastic flow analyses. Measurement Science and Technology. 2010;21(5):054014. http://doi.org/10.1088/0957-0233/21/5/054014
26. Mendenhall W.M., Sincich T.L. Statistics for Engineering and the Sciences. New York: Chapman and Hall/CRC; 2016:1182.
About the Authors
S. P. BuyakovaRussian Federation
Svetlana P. Buyakova, Dr. Sci. (Eng.), Chief Researcher, Head of the Laboratory of Physical Mesomechanics and Non-Destructive Testing
2/4 Akademicheskii Ave., Tomsk 634055, Russian Federation
K. N. Kayurov
Russian Federation
Konstantin N. Kayurov, General Director
34 2nd Yurginskaya Str., Novosibirsk 630051, Russian Federation
S. A. Barannikova
Russian Federation
Svetlana A. Barannikova, Dr. Sci. (Phys.-Math.), Leading Researcher of the Laboratory of Strength Physics
2/4 Akademicheskii Ave., Tomsk 634055, Russian Federation
Review
For citations:
Buyakova S.P., Kayurov K.N., Barannikova S.A. Inhomogeneity of deformation of surfaced stainless steel. Izvestiya. Ferrous Metallurgy. 2024;67(6):679-685. https://doi.org/10.17073/0368-0797-2024-6-679-685


