Scroll to:
Effect of heat treatment on structure of austenitic steel 07Cr25Ni13 obtained by WAAM
https://doi.org/10.17073/0368-0797-2024-3-303-310
Abstract
Currently, the use of additive technologies in industry is becoming more promising. The intensification of development of 3D technologies leads to the need for a more thorough study of the structure and properties of metals obtained by this method. In this paper, the effect of heat treatment on structure of the metal deposited by Wire Arc Additive Manufacturing (WAAM) is considered. The paper describes the effect of quenching at various temperatures and annealing on the structure of austenitic steel 07Cr25Ni13. As a result of the work, it was found that during metal deposition, crystallization occurs according to the FA type with the formation of a coarse dendritic structure with mainly skeletal and vermicular morphology, consisting of δ- and σ-phases. It is noted that quenching at 1070 ℃ practically does not change the metal structure. Despite the fact that quenching at elevated temperatures (1100 ℃) leads to partial dissolution and spheroidization of the dendrites released during surfacing, there are no cardinal structural changes. The most complete dissolution of the dendritic component occurs during quenching at 1150 ℃. The structure after this procedure is predominantly austenitic, remains of the dendritic component are represented by small spherical inclusions. The steel structure after annealing (1150 ℃) practically does not differ from the structure obtained after quenching at the same temperature. A significant increase in grain size, typical for austenitic steels, is not observed in this case. Based on the structure obtained after heat treatment, the most promising treatment options for future physico-mechanical properties are quenching and annealing at 1150 ℃.
Keywords
For citations:
Anosov M.S., Sorokina S.A., Chernigin M.A., Mordovina Yu.S. Effect of heat treatment on structure of austenitic steel 07Cr25Ni13 obtained by WAAM. Izvestiya. Ferrous Metallurgy. 2024;67(3):303-310. https://doi.org/10.17073/0368-0797-2024-3-303-310
Introduction
Currently, austenitic steels are widely used in the chemical, oil, and food industries, as well as in the production of medical and nuclear power plant equipment [1]. A number of industries in the modern world can hardly exist without austenitic corrosion-resistant steels. This type of material possesses unique properties, such as high corrosion resistance in acid and alkaline environments of varying corrosive strength, as well as paramagnetism. The combination of physical and mechanical properties is achieved not only through alloying with significant amounts of chromium, nickel, magnesium, and other elements but also through maintaining a homogeneous austenitic structure throughout the product’s entire service life [2].
Currently, additive technologies are becoming increasingly promising for industry as they reduce the total cost of products, especially in single and small batch production. The rapid development of 3D printing technologies necessitates a thorough investigation of the mechanical properties, structure, and chemical composition of metals produced by these methods. To date, the main methods of metal 3D printing are layer-by-layer powder fusion (selective laser sintering, SLM), laser powder deposition (laser engineered net shaping, LENS/direct metal deposition, DMD), and electric arc deposition (wire arc additive manufacturing, WAAM) [3]. WAAM 3D printing, which we used for this study, is the most productive and technologically simple [4; 5].
The advantages of additive manufacturing methods are as follows:
– the process of obtaining products can be fully automatized;
– when products are manufactured of expensive materials, such as titanium and nickel alloys, the material consumption is considerably reduced;
– small batch production, unprofitable when using traditional production methods, becomes cost-efficient [6 – 8].
SLM technology enables the manufacture of complex products by laser melting of metal powder using CAD models. At the powder melting point, the energy density is higher compared to other electric arc processes (e.g., welding), but lower than in the case of laser exposure [9]. The main problem of parts produced by the SLM method is relatively high surface roughness, which reduces fatigue resistance by increasing stress concentration on the sample surface [10].
Laser powder deposition is the process of overlay welding performed by fusing the powdered material layer onto the substrate. The laser beam creates a molten bath into which the powdered metal is introduced. The metal melts and solidifies in the bath to form metallic bonds with the substrate. During the surfacing process, the powdered metal is automatically fed from the feed system to the substrate, which is lowered to the height equal to the thickness of the layer to be deposited. However, it should be noted that the laser deposition method does not ensure reproducibility of the chemical composition and mechanical properties of the final products [11; 12], which is a significant disadvantage of this technology.
WAAM technology is a relatively new additive growth method that emerged in the 1990s. It includes depositing a common welding wire, widely available commercially, onto the substrate, resulting in a finished part. Compared to conventional manufacturing, WAAM can reduce manufacturing time by 40 – 60 % and post-processing time by 15 – 20 %, depending on the size of the part. For example, the use of this technology for manufacturing airplane landing gear stiffeners results in about 78 % raw material savings compared to conventional production [13]. Metals with good weldability can potentially be used for the WAAM process, and so far, researchers have successfully applied this method to fabricate parts from Ti [13], Al [14], steel [15], and Ni [16] based alloys.
In the additive growth process, the surfaced metal is in a liquid state and is subsequently subjected to multiple cycles of high-temperature heating, including to temperatures above critical. As a result, the microstructure of the surfaced metal differs from that of metal produced by conventional technologies, and consequently, the physicochemical and strength properties of the metal may also differ from those of rolled material.
An increasing number of foreign studies are investigating the application of additive technologies in industry. However, in Russia, these methods are developing locally and are not yet widespread. In addition to reducing the cost of small-batch products from austenitic steels, which are currently quite popular, additive technologies can also contribute to the advancement of Russian science.
The objective of this study is to explore the effect of heat treatment modes on the structure of austenitic steel 07Cr25Ni13 obtained by additive growth using the WAAM method.
Materials and methods
The research was conducted using metastable austenitic steel 07Cr25Ni13 obtained by the WAAM method. The samples for investigating the deposited metal were produced on a specialized bench for additive arc surfacing [17]. Surfacing was performed with the following parameters: I = 120 А; U = 24 V; v = 350 mm/min. A shielding gas mixture of 98 % Ar and 2 % CO2 was used. The samples for metallographic studies were cut from the obtained blanks using waterjet cutting followed by milling. ER309LSI welding wire was used as the initial material for surfacing. The chemical composition of the wire is presented Table 1.
Table 1. Chemical composition of the studied material
| |||||||||||||||||||||||||||||||||||||||
The metal surfacing process can result in the loss of alloying elements. The chemical composition of the surfaced metal was determined using a Foundry-Master optical emission analyzer.
The structural affiliation of the deposited material to the austenitic class was derived from the Scheffler diagram. According to the literature data [15 – 20], the phase composition obtained after surfacing depends on the Creq and Nieq ratio and can be specified from the Scheffler diagram.
We know from the literature sources [18 – 23] that phase transformations during crystallization and the final phase composition depend on the Creq / Nieq ratio and are divided into the following types:
• A (<1.25): L – (L + γ) – γ;
• AF (1.25 \( \ll \) 1.48): L – (L + γ) – (L + γ + δ) – (γ + δ);
• FA (1.48 \( \ll \) 1.95): L – (L + δ) – (L + δ + γ) – (δ + γ);
• F (>1.95): L – (L + δ) – (δ + γ).
These equivalents were determined using the following formulas
| Creq = Cr + Mo + 1.5Si + 0.5Nb + 2Ti; | (1) |
| Nieq = Ni + 30C + 0.5Mn. | (2) |
Metallographic studies were performed in cross section relative to the surfacing direction at magnifications of 100 and 200, and the milled surface of the samples was also examined. The metallographic sections were prepared following the standard procedure – the samples were sanded mechanically using the sandpaper of different grits and polished with pastes. The solution consisting of 5 cm3 HNO3 , 50 cm3 HCl and 50 cm3 H2O was used as a chemical etching reagent.
To investigate the impact of heat treatment on the structure of the samples, we performed quenching in three modes followed by metal annealing. The heat treatment parameters are presented in Table 2.
Table 2. Modes of the samples heat treatment
|
Results and discussion
The study of the chemical composition of the surfaced metal revealed the decrease in the content of all alloying elements (AE), except silicon. The diminishing AE concentration is typical for metal welding and smelting processes due to their losses. The increased wire content in the surfaced metal compared to the original wire can be attributed to the heterogeneity of its chemical composition along its length. It should be noted that as the steel chemical composition changed after surfacing, the AE content variations did not exceed the permissible limit (in accordance with GOST 2246 – 70). The final composition of the surfaced metal is presented in Table 3.
Table 3. Chemical composition of the surfaced metal
| |||||||||||||||||||||||||||||||||||||||
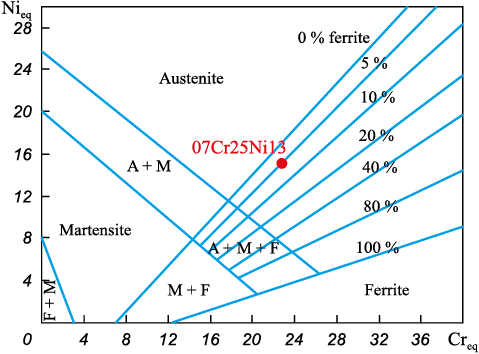
Chromium and nickel equivalents are calculated by the formulas (1), (2): Creq – 23.2578; Nieq – 14.815. The Creq / Nieq ratio is 1.57, hence, in this case the transformations during crystallization can be described by the FA mode (the Creq / Nieq ratio exceeds 1.48). The approximate ferrite content in the surfaced metal can be determined from the Scheffler diagram (Fig. 1).
Fig. 1. Location of steel 07Cr25Ni13 on the Scheffler diagram |
Based on the above diagram, the approximate content of δ-ferrite in the metal after surfacing is about 7.5 %, which is consistent with the theoretical data [24].
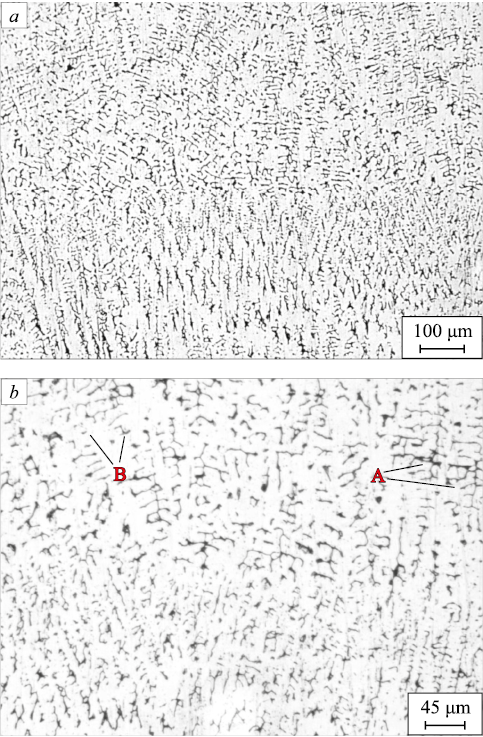
We studied the cross direction relative to the metal surfacing axis based on the microstructural analysis of the samples before and after the heat treatment. Fig. 2 shows the structure of the surfaced metal prior to heat treatment.
Fig. 2. Structure of the sample after surfacing: |
The dendrites are oriented normal to the surface of the laser track due to the direction of heat removal. The dendrites located deep within the surfaced metal have a more developed boundary structure. The dendritic structure refinement on the laser track surface can be put down to the supply of additional thermal energy as the next metal layer is deposited. In general, the structure of the surfaced metal is similar to the microstructure resulting from the crystallization of austenitic steel.
It was noted in [25] that the dendrites formed during surfacing may include δ-ferrite and σ-phase. Fig. 3, b shows that δ-ferrite has mainly skeletal and vermicular morphology. Surfacing of AISI 316L [25] and AISI 316 [26] steel resulted in a similar structure. The interdendritic space is filled with γ-phase (austenite).
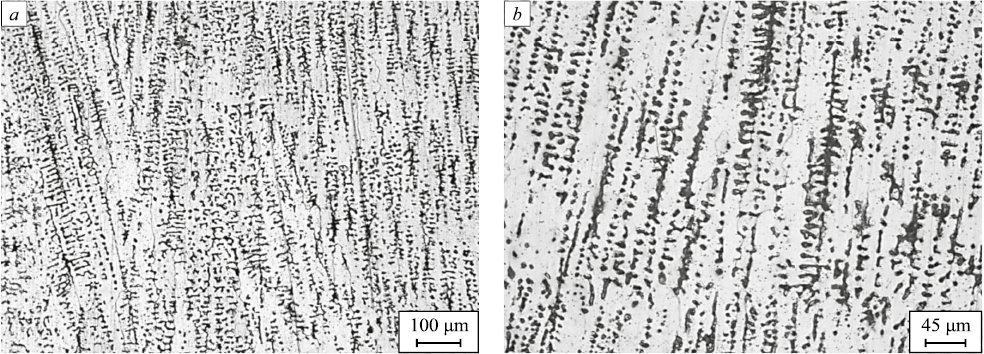
Fig. 3. Structure of the sample after quenching according to mode 1: |
Austenitization according to mode 1 (1070 ℃, 30 min) did not result in visible changes in the grain structure, which is indicative of insufficient holding time or temperature or both during austenitization (Fig. 3). It should be noted that the overall etchability of the samples increased.
The grain boundaries only begin to emerge in the structure after heat treatment according to mode 1, which is also indicative of insufficient holding at the austenitization temperature (Fig. 3). The dendritic structure does not decrease, which indirectly shows that the content of δ- and σ-phases did not reduce. The δ-ferrite morphology does not significantly change.
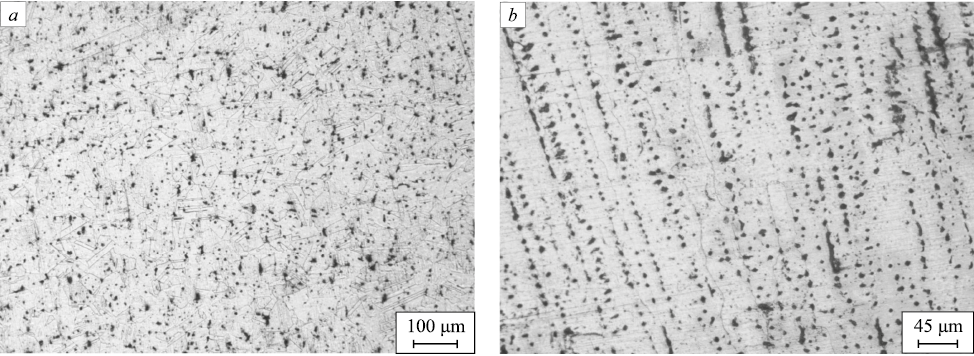
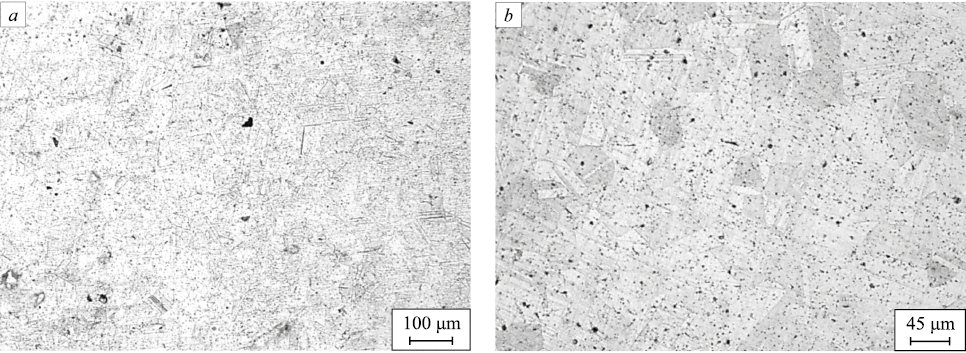
We performed quenching using mode 2 (1100 ℃, 60 min) to study the effect of increased austenitization temperature and holding time. Fig. 4 shows the sample microstructure in the direction transverse to the surfacing axis after heat treatment according to mode 2.
Fig. 4. Structure of the sample after quenching according to mode 2: |
In the micrographs of the sample after austenitization at 1100 ℃, the grains formed can be seen more clearly. The dendrite size generally decreases compared to the microstructure after surfacing and treatment according to mode 1. This effect indicates more complete diffusion processes during austenitization. Spheroidization of dendritic components is observed, their general orientation remaining the same. The percentage of δ-ferrite and σ-phase should significantly decrease after this treatment.
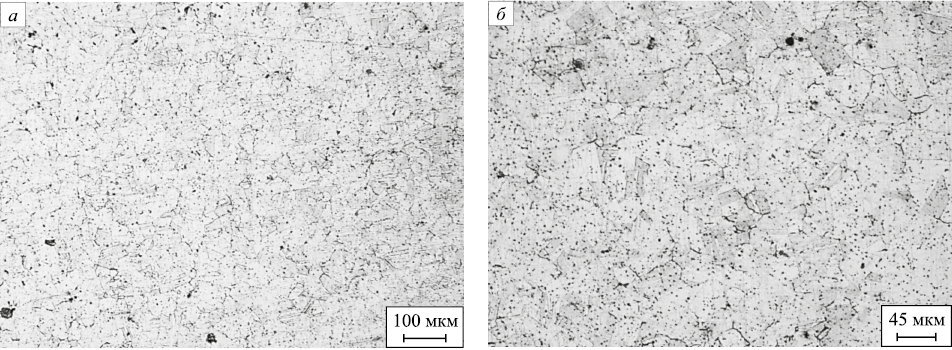
After quenching according to mode 3 (1150 ℃, 60 min), grain boundaries and austenite twins are clearly visible in the metal structure (Fig. 5). The dendritic structure dissolved almost completely; the dendrites that failed to do so are represented by small spheroidal inclusions.
Fig. 5. Structure of the sample after quenching according to mode 3: |
Mode 4 (1150 ℃, 60 min) enables more complete dissolution of the remaining dendrites because at such metal temperatures, the diffusion is active for a longer time. The austenitic structure of the metal with characteristic twins is clearly visible (Fig. 6).
Fig. 6. Structure of the sample after annealing according to mode 4: |
It should be noted that after annealing according to mode 4, there is no significant grain increase compared to quenching at the same temperature and holding time.
Conclusions
It is found that after WAAM surfacing, steel 07Cr25Ni13 forms a rough dendritic structure, which may consist of δ-ferrite and σ-phase. The post-deposition structure features δ-ferrite of skeletal and vermicular morphology, with the interdendritic space filled with γ-phase. The phase composition of the deposited material is consistent with that determined from the Scheffler diagram.
Austenitization at 1070 ℃ with a 30 min holding time practically does not change the structure of the deposited metal. After aging the samples at 1100 ℃ for 60 min, we can clearly see the formation of austenitic grains and a reduction in dendrite size. Thus, structural-phase transformations in steel 07Cr25Ni13 require heating to temperatures above 1100 ℃ during heat treatment.
Quenching according to mode 3 (1150 ℃, 60 min) results in almost complete dissolution of dendrites. The remaining undissolved dendrites appear as small spheroidized particles.
The metal structure after heat treatment according to mode 4 (1150 ℃, 60 min, furnace cooling) is practically the same as that of the metal quenched from the same temperature. A significant increase in grain size, typical for austenitic steels, is not observed in this case.
In terms of potential physical and mechanical properties, heat treatment modes 3 and 4 proved to be the most favorable.
References
1. Chernigin M.A., Sorokina S.A., Vorobyev R.A. Study of the microstructure of metastable austenitic chromium manganese steel 14Kh15G9ND by optical and electron microscopy. Industrial Laboratory. Diagnostics of Materials. 2023;89(4):38–44. (In Russ.). https://doi.org/10.26896/1028-6861-2023-89-4-38-44
2. Sorokina S.A., Vorob’ev R.A., Gorshunov M.G., Chernigin M.A. Use of chromium-manganese corrosion-resistant steel in district heating network applications. Metal Science and Heat Treatment. 2023;65(3–4):159–166. https://doi.org/ 10.1007/s11041-023-00908-z
3. Li J.L.Z., Alkahari M.R., Rosli N.A.B., Hasan R., Sudin M.N., Ramli F.R. Review of wire arc additive manufacturing for 3D metal printing. International Journal of Automation Technology. 2019;13(3):346–353. https://doi.org/10.20965/ijat.2019.p0346
4. Ding D., Pan Z., Cuiuri D., Li H. Wire-feed additive manufacturing of metal components: technologies, developments and future interests. The International Journal of Advanced Manufacturing Technology. 2015;81:465–481. https://doi.org/10.1007/s00170-015-7077-3
5. Wu B., Pan Z., Ding D., Cuiuri D., Li H., Xu J., Norrish J. A review of the wire arc additive manufacturing of metals: Properties, defects and quality improvement. Journal of Manufacturing Processes. 2018;35:127–139. https://doi.org/10.1016/j.jmapro.2018.08.001
6. Oskolkov A.A., Matveev E.V., Bezukladnikov I.I., Trushnikov D.N., Krotova E.L. Advanced technologies for additive manufacturing of metal product. Bulletin PNRPU. Mechanical engineering, materials science. 2018;20(3):90–105. (In Russ.). https://doi.org/10.15593/2224-9877/2018.3.11
7. Cunningham C.R., Wikshåland S., Xu F., Kemakolam N., Shokrani A., Dhokia V., Newman S.T. Cost modelling and sensitivity analysis of wire and arc additive manufacturing. Procedia Manufacturing. 2017:11:650–657. https://doi.org/10.1016/j.promfg.2017.07.163
8. Pant H., Arora A., Gopakumar G.S., Chadha U., Saeidi A., Patterson A.E. Applications of wire arc additive manufacturing (WAAM) for aerospace component manufacturing. The International Journal of Advanced Manufacturing Technology. 2023;127:4995–5011. https://doi.org/10.1007/s00170-023-11623-7
9. Wang F., Williams S., Rush M. Morphology investigation on direct current pulsed gas tungsten arc welded additive layer manufactured Ti6Al4V alloy. The International Journal of Advanced Manufacturing Technology. 2011;57:597–603. https://doi.org/10.1007/s00170-011-3299-1
10. Ahmadkhaniha D., Möller H., Zanella C. Studying the microstructural effect of selective laser melting and electropolishing on the performance of maraging steel. Journal of Materials Engineering and Performance. 2021;30:6588–6605. https://doi.org/10.1007/s11665-021-05927-6
11. Beese A.M., Carroll B.E. Review of mechanical properties of Ti–6Al–4V made by laser-based additive manufacturing using powder feedstock. JOM. 2016;68:724–734. https://doi.org/10.1007/s11837-015-1759-z
12. Kirka M.M., Lee Y., Greeley D.A., Okello A., Goin M.J., Pearce M.T., Dehoff R.R. Strategy for texture management in metals additive manufacturing. JOM. 2017;69:523–531. https://doi.org/10.1007/s11837-017-2264-3
13. Williams S.W., Martina F., Addison A.C., Ding J., Pardal G., Colegrove P. Wire + arc additive manufacturing. Materials Science and Technology. 2016;32(7):641–647. https://doi.org/10.1179/1743284715Y.0000000073
14. Gu J., Ding J., Williams S.W., Gu H., Bai J., Zhai Y., Ma P. The strengthening effect of inter-layer cold working and post-deposition heat treatment on the additively manufactured Al–6.3Cu alloy. Materials Science and Engineering: A. 2016;651:18–26. https://doi.org/10.1016/j.msea.2015.10.101
15. Nannan G., Ming L. Additive manufacturing: Technology, applications and research needs. Frontiers of Mechanical Engineering. 2013;8:215–243. https://doi.org/10.1007/s11465-013-0248-8
16. Xu F., Lv Y., Liu Y., Shu F., He P., Xu B. Microstructural evolution and mechanical properties of Inconel 625 alloy during pulsed plasma arc deposition process. Journal of Material Science and Technology. 2013;29(5):480–488. https://doi.org/10.1016/j.jmst.2013.02.010
17. Kabaldin Y.G., Shatagin D.A., Anosov M.S., Kolchin P.V., Kiselev A.V. Diagnostics of 3D printing on a CNC machine by machine learning. Russian Engineering Research. 2021;41(4):320–324. https://doi.org/10.36652/0042-4633-2021-1-55-59
18. Fetisov G. P., Karpman M. G., etc. Materials Science and Technology of Metals. Moscow: Vysshaya shkola; 2002:638.
19. Suuatala N., Takalo T., Moisio T. The relationship between solidification and microstructure in austenitic and austenitic-ferritic stainless steel welds. Metallurgical and Materials Transactions A. 1979;10:512–514. https://doi.org/10.1007/BF02697081
20. Kim Y.H., Kim D.G., Sung J.H., Kim I.S., Ko D.E., Kang N.H., Hong H.U., Park J.H., Lee H.W. Influences of Cr/Ni equivalent ratios of filler wires on pitting corrosion and ductility-dip cracking of AISI 316l weld metals. Metals and Materials International. 2011;17:151–155. https://doi.org/10.1007/s12540-011-0221-1
21. Jacob G. Prediction of solidification phases in Cr-Ni stainless steel alloys manufactured by laser based powder bed fusion process. NIST Advanced Manufacturing Series (NIST AMS). 2018;100–114:1–38. https://doi.org/10.6028/NIST.AMS.100-14
22. Olson D.L. Prediction of austenitic weld metal microstructure and properties. Welding Research Supplement. 1985;64:281–295.
23. Sindo K. Welding Metallurgy. 2nd ed. New York: Willey; 2003.
24. Astafurov S., Astafurova E. Phase composition of austenitic stainless steels in additive manufacturing: A Review. Metals. 2021;11(7):1052. https://doi.org/10.3390/met11071052
25. Chen X., Li J., Cheng X., He B., Wang H., Huang Z. Microstructure and mechanical properties of the austenitic stainless steel 316L fabricated by gas metal arc additive manufacturing. Materials Science and Engineering: A. 2017;703: 567–577. https://doi.org/10.1016/j.msea.2017.05.024
26. Gürol U., Kocaman E., Dilibal S., Koçak M. A comparative study on the microstructure, mechanical properties, wear and corrosion behaviors of SS 316 austenitic stainless steels manufactured by casting and WAAM technologies. CIRP Journal of Manufacturing Science and Technology. 2023;47: 215–227. https://doi.org/10.1016/j.cirpj.2023.10.005
About the Authors
M. S. AnosovRussian Federation
Maksim S. Anosov, Cand. Sci. (Eng.), Assist. Prof. of the Chair “Technology and Equipment Engineering”
24 Minina Str., Nizhny Novgorod 603022, Russian Federation
S. A. Sorokina
Russian Federation
Svetlana A. Sorokina, Cand. Sci. (Eng.), Assist. Prof. of the Chair “Materials Science, Technology of Materials and Heat Treatment of Metals”
24 Minina Str., Nizhny Novgorod 603022, Russian Federation
M. A. Chernigin
Russian Federation
Mikhail A. Chernigin, Postgraduate of the Chair “Technology and Equipment Engineering”
24 Minina Str., Nizhny Novgorod 603022, Russian Federation
Yu. S. Mordovina
Russian Federation
Yuliya S. Mordovina, Engineer of the Chair “Technology and Equipment Engineering”, Postgraduate
24 Minina Str., Nizhny Novgorod 603022, Russian Federation
Review
For citations:
Anosov M.S., Sorokina S.A., Chernigin M.A., Mordovina Yu.S. Effect of heat treatment on structure of austenitic steel 07Cr25Ni13 obtained by WAAM. Izvestiya. Ferrous Metallurgy. 2024;67(3):303-310. https://doi.org/10.17073/0368-0797-2024-3-303-310


